Installing Dash
What Will You Need?
AWS Environment
AWS User With Administrator Permissions – (the CloudFormation template creates resources that require a higher permission set)
About 10-15 minutes of time
Note: The following instructions are for the Dash pay-as-you-go offering. Please contact Dash for instructions regarding any other offerings or solutions.
Installation Instructions
Log into AWS account and pick your preferred region.
When setting up Dash ComplyOps, you must use the MASTER account in AWS. This is typically the first account your organization sets up. You can verify the master account by clicking the avatar in the top right corner and clicking ‘My Organization‘. You should see a table of accounts. The master account will have a tag next to it stating it is the master account. You must use that account to perform the set up.
Create an application-specific pem key. This is done in the EC2 module. You will need to create this pem key in the region/availability zone that you will be deploying the Dash CloudFormation template. Make sure to keep this pem key accessible for future use. You will need to use that pem key to SSH in if needed. By default, SSH access is disabled but can be opened up if needed of course.
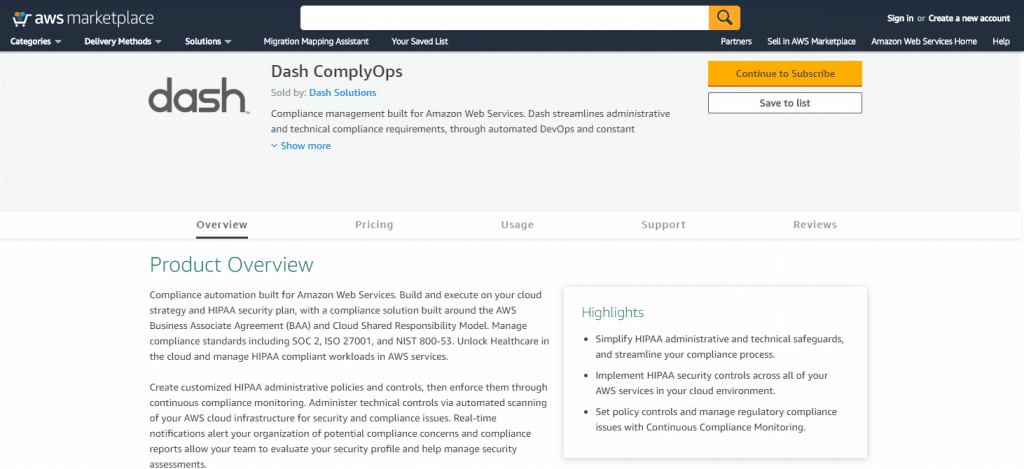
Go to AWS Marketplace and navigate to the Dash ComplyOps Offering.
5. Click the “Continue to Subscribe” button.
6. You will be presented with a page displaying Dash contract options:
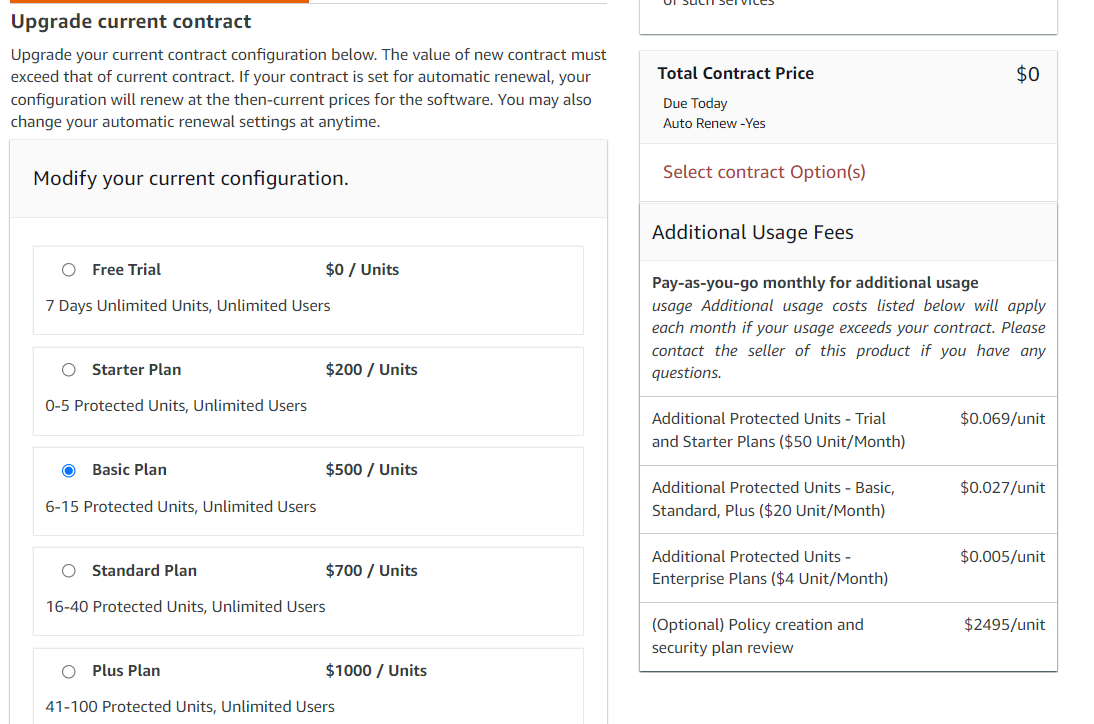
You can select a plan based on the size of your cloud environment. You can read more about pricing plans here. New users looking for a free trial may want to consider selecting the Free Trial plan.
Each plan will be allocated a certain number of protected units, if your organization goes over this allocation, you will be billed overage based on your plan. Your team can upgrade your plan to a higher plan/tier of protected units at anytime.
Discounted pricing is provided for longer term contracts (1 year, 2 year, 3 year contracts). Your team has the option of selecting one of these contracts on this page.
After selecting your plan, click the “Create contract” button.
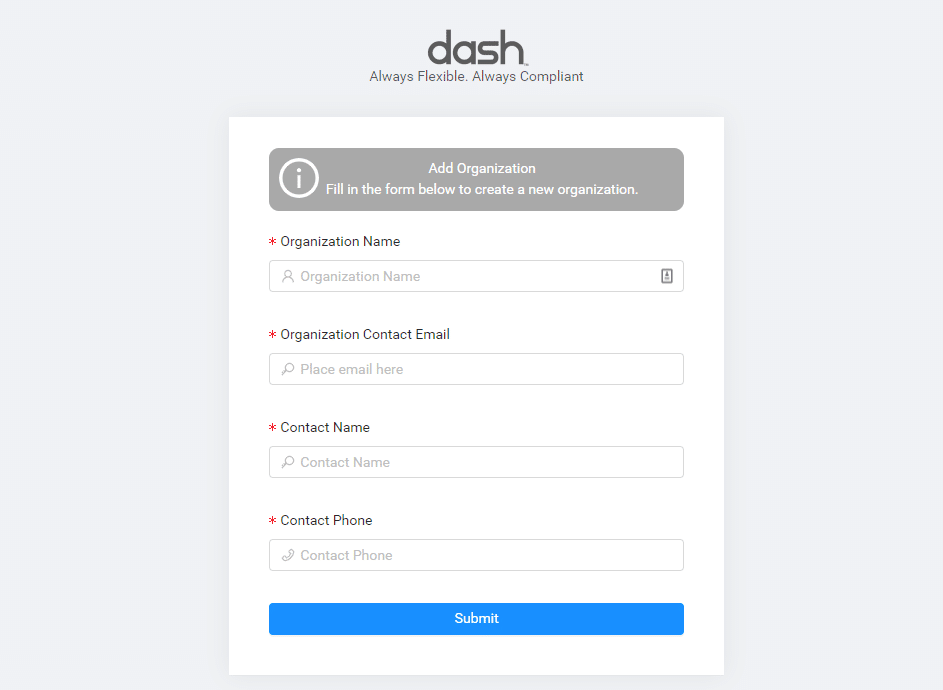
7. You will be directed to a form page. Please enter your team’s:
Organization Name
Organization Contact Email (This email will need to be accessible to complete installation)
Contact Name
Contact Phone
Click the “Submit” button.
8. On completion of this form, you will see a message that this step is complete.
You will now receive an email in your inbox with further licensing needed for installation. In another tab or browser window, please navigate to the previously entered email and open the most recent Dash ComplyOps email. (It may take 5 minutes or so to receive this email. If you cannot find this email, you may check your Spam folder.)
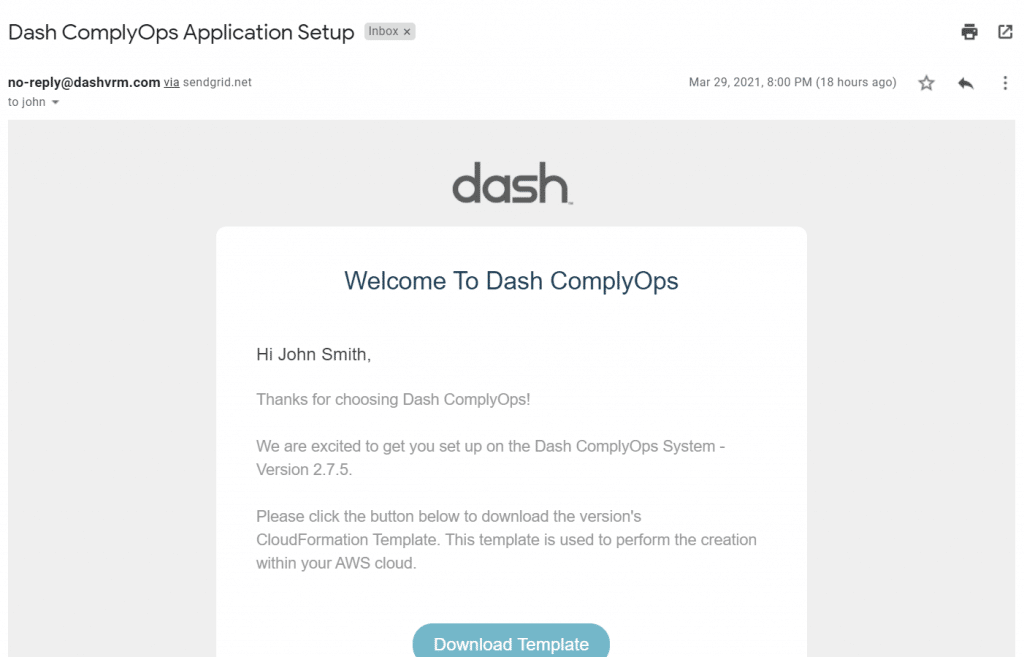
9. In the Dash email, click the button to download the CloudFormation template. This will download a file to your computer for the next installation steps.
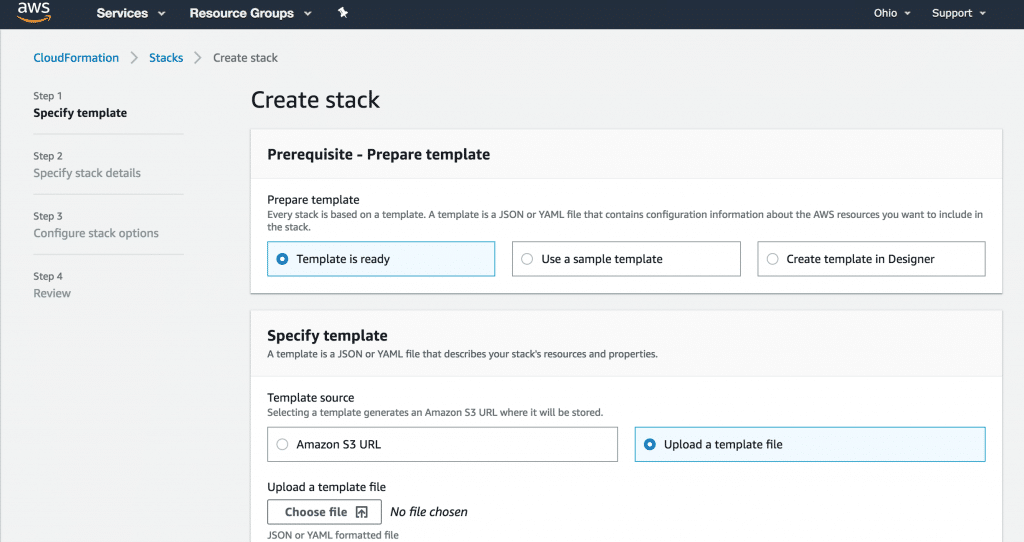
10. Now navigate to CloudFormation in the AWS console.
11. In CloudFormation click the “Create Stack” button. Then click “With new resources (standard)”

12. Under the Specify template section, select “Upload a template file” for the Template Source.
Then upload the CloudFormation template file you downloaded in the email in Step #9.
Then click the “Next” button.
13. Go to next page, and fill out the form on this page.
Here is what the form should look like at the end:
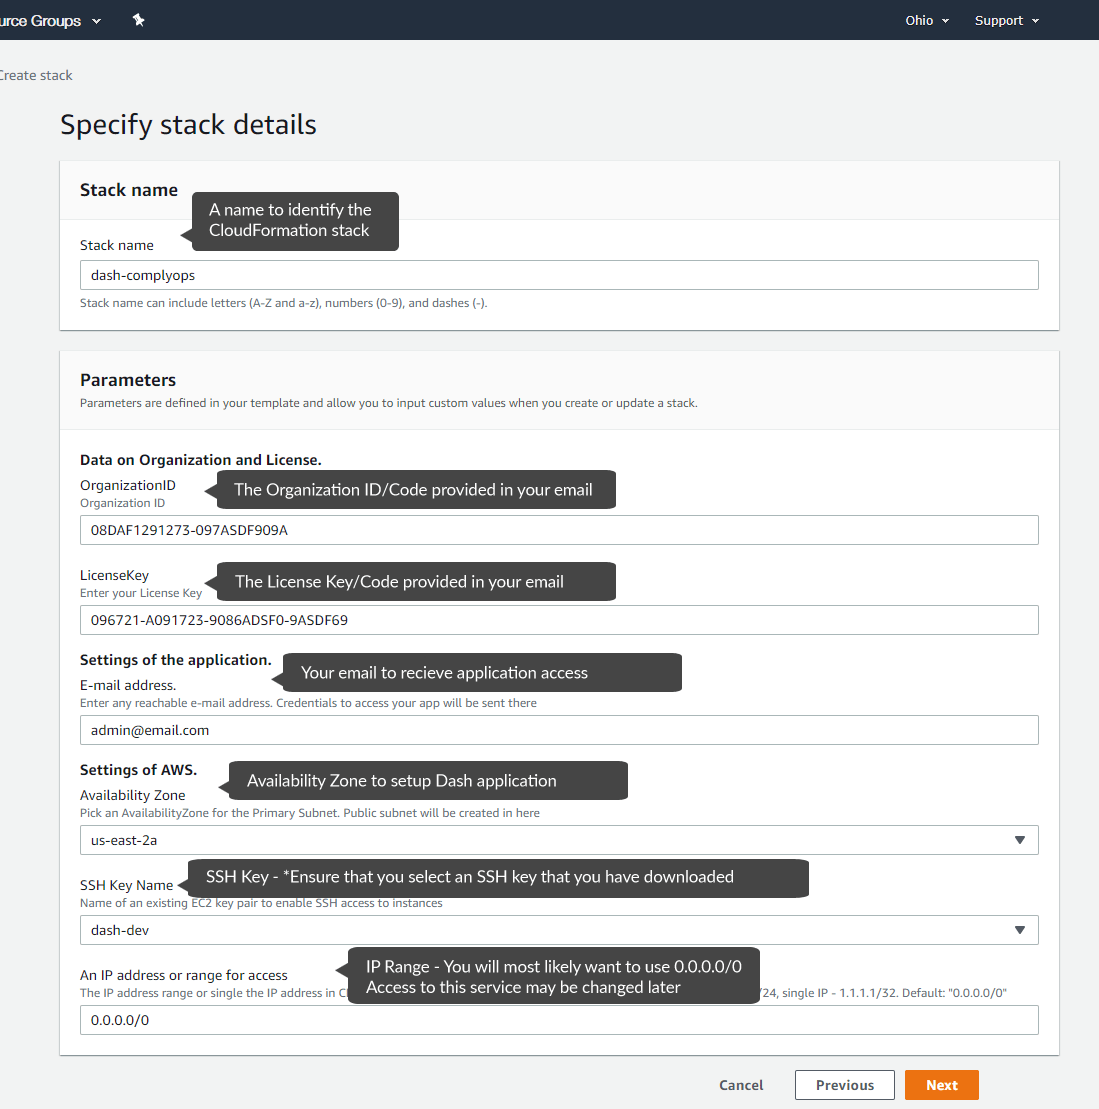
Most fields have default values that are appropriate to stick with. Otherwise, provide a value that makes sense for your environment.
14. Once you have filled out the form, click “Next”.
15. Scroll to bottom and click “Next”.
16. Scroll to bottom and check the box – “I acknowledge that AWS CloudFormation might create IAM resources with custom names.“
Then click the “Create stack” button
17. The process will take a few minutes.
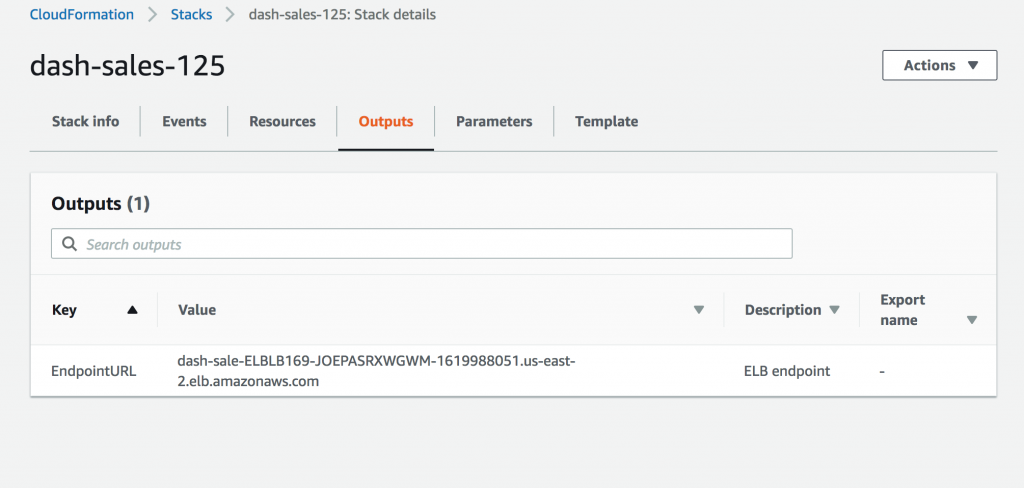
18. Once the CloudFormation stack has the status CREATE_COMPLETE, you will be able to access the Dash Application by copying the link from the CloudFormation Outputs tab.
Note: It may take another couple minutes for the application to be provisioned, initialized, and display at the Output URL.
Application Initialization
Ensure the newly created Dash S3 bucket does not have public access blocked through Account Wide or Bucket Policy. (See steps for ensuring S3 bucket access.)
Go to the EndpointURL link provided in the CloudFormation Output tab.
The application may take up to 5 minutes to start up.
Once the application loads, it will look like this:
Organization Validation – Put in the organization id and license code to validate your organization
Create New User – Put in an appropriate email and password for the first user
AWS Account Configuration – In this step, we will validate the AWS cloud setup and make sure that all permissions are established properly.
Final Step – Click ‘Next’ to sign in.
At this point, you can log in and use the application.
Further Configuration and Troubleshooting
Initial S3 Bucket Access Requirements
Dash uses S3 bucket public access to generate and share a unique CloudFormation template for scanning AWS sub-accounts. Before continuing through application installation/initialization, your team must ensure that the Dash created S3 bucket can be accessed via public access.
If you do not need to connect multiple AWS accounts or sub accounts to Dash monitoring, you can safely disable public access after Dash installation complete
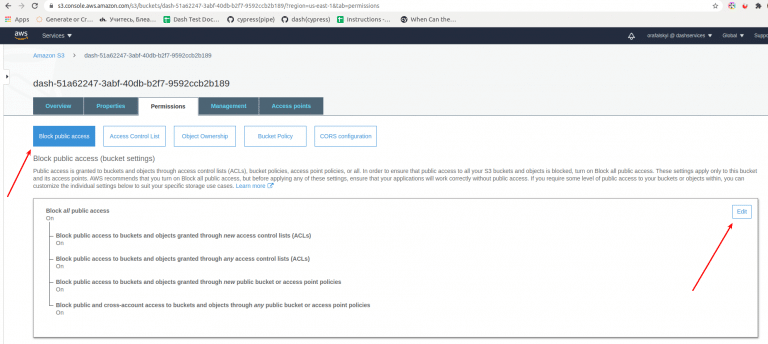
Take the following steps to disable settings for “Block all public access” in S3:
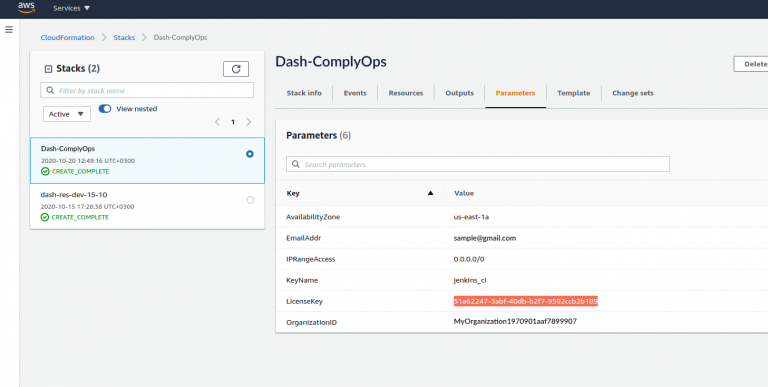
Copy your license key. It can be found in the email that you received from DASH, or in the “Parameters” tab in your CloudFormation Stack options.
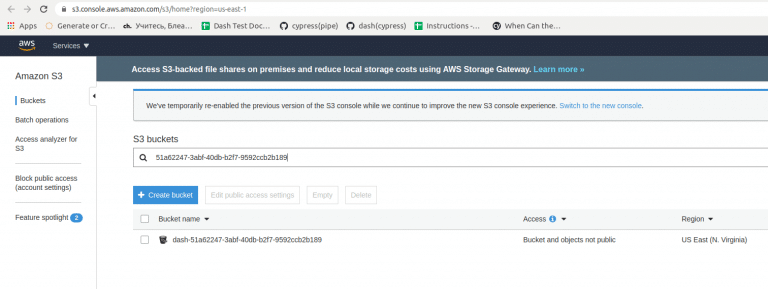
Go to Amazon S3 Management Console. And paste your key into the search box.
Click on Bucket’s name. Bucket Overview page should open.
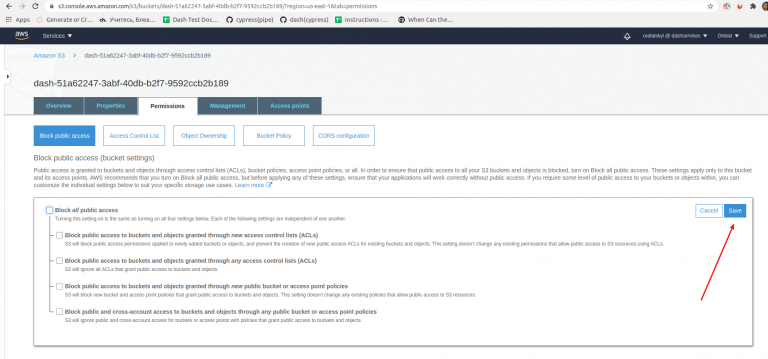
Go to the Permissions tab. Click on the “Block public access” button then on the “Edit” button. Uncheck all checkboxes, click “Save” and confirm changes.