
Vendor Management
The Dash Vendors area is used to view, track, and assess security posture of third-party vendors. Your organization can use this area to create a full inventory of software vendors and service providers connected to your team..
Dash provides the ability to add vendor information including - vendor products, contact information, security attestations, and more. Organizations can review vendors on a regular basis, as well as create PDF vendor lists as needed for audits and validation.
Vendors Page
You can view the Vendors area by logging into Dash ComplyOps and navigating to “Vendors” in the left sidebar.
Here is an example of how vendors may be displayed in your Vendor page:
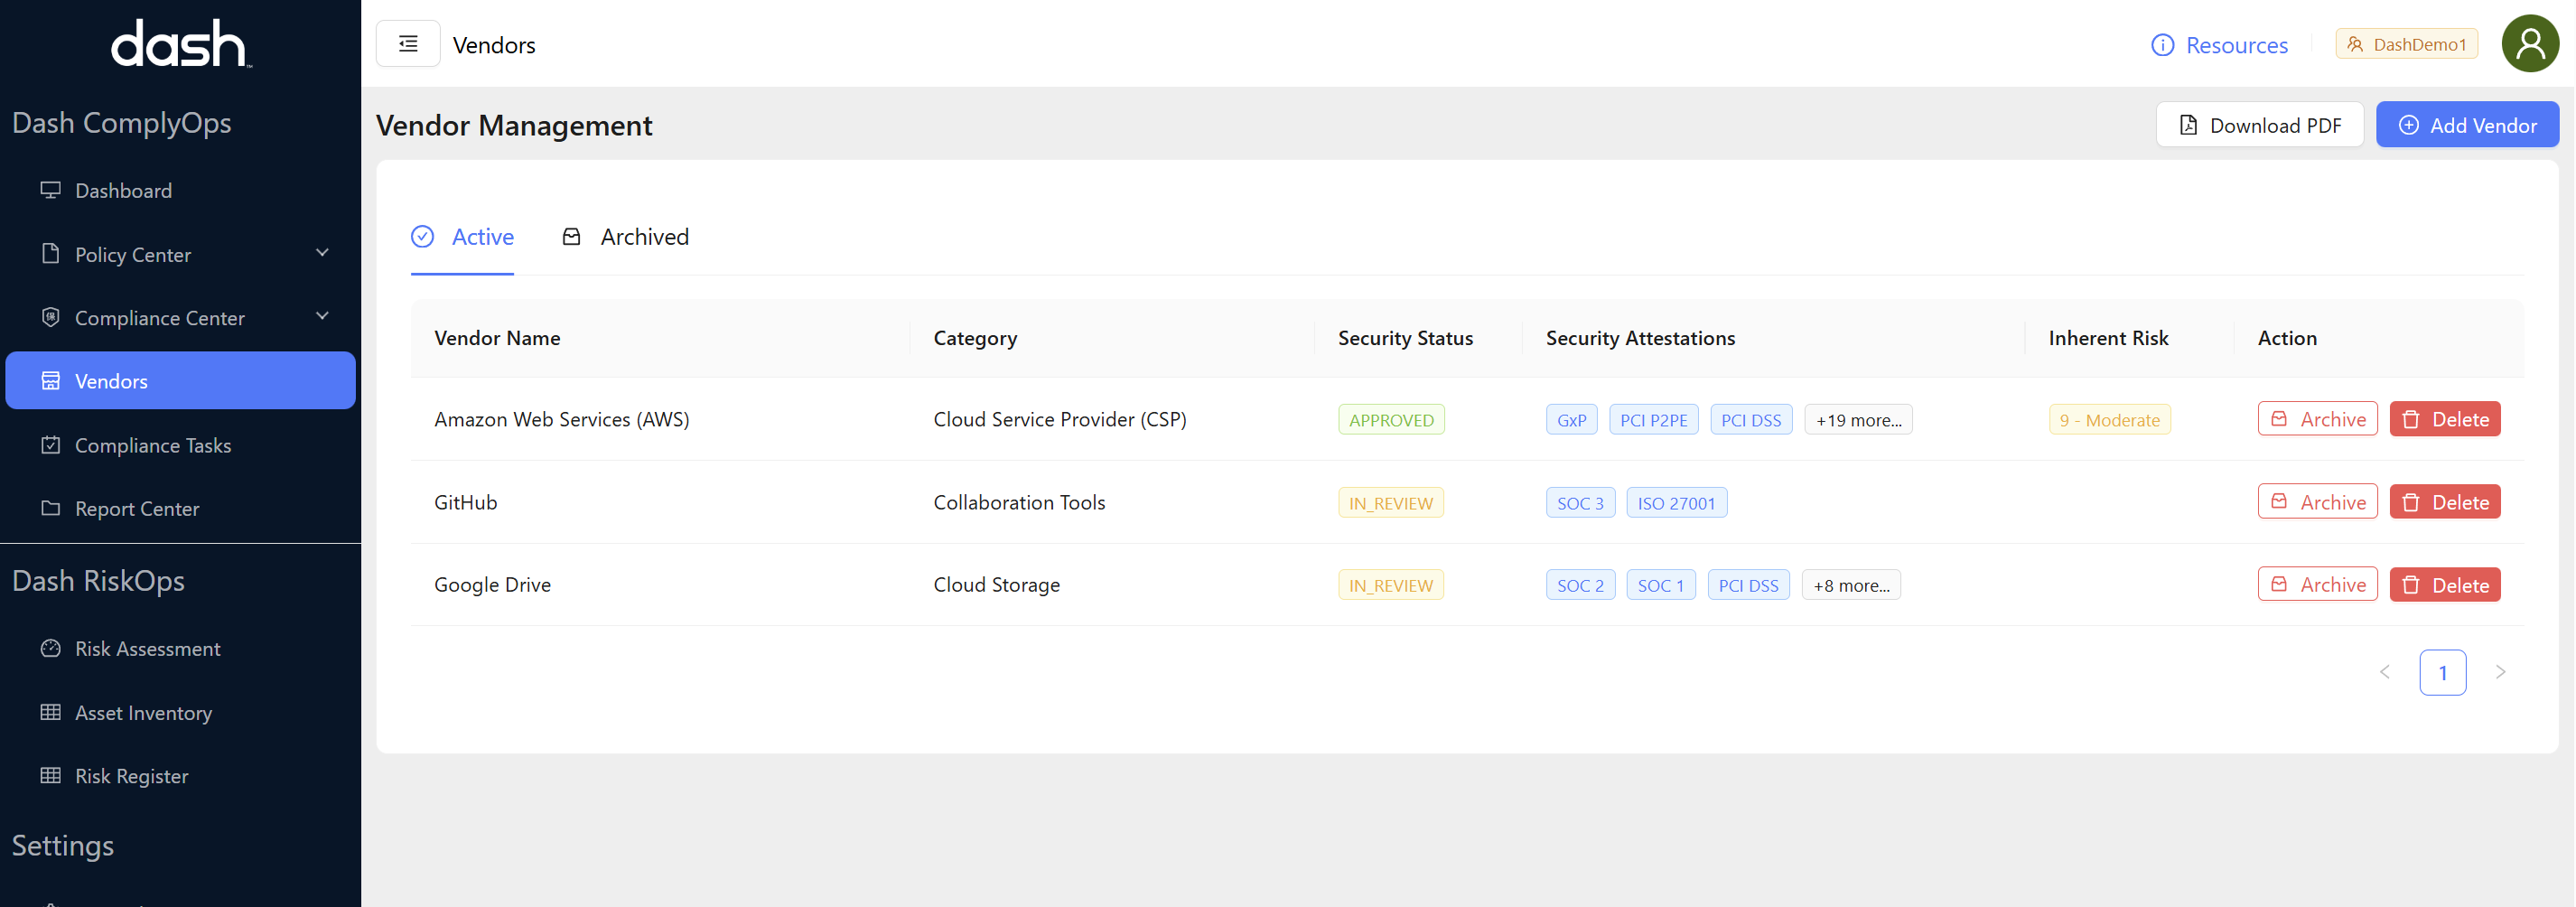
Vendors can be sorted by the following sections:
Active Vendors - All vendors that are in your active vendors list
Archived Vendors - All vendors that are in the archived vendors list
Vendors Security Status is shown as the following:
Approved - Vendors that have been “approved” and do not have review date
In Review - Vendors where the vendor has been marked as “in review” or “followup required”
Vendor Inherent Risk is shown as the following:
Score 1 - 25 - Inherent risk is a score defined between 1 (lowest risk) to 25 (highest risk) by the organization, based on vendor security attestations, security posture, and overall data shared.
The following options are provided for the Vendor page:
Download PDF - At any point your team can create a downloadable PDF by clicking button “Download PDF” on the top right of the page.
Add Vendor - Add a vendor to your Active vendors list
Archive Vendor - Move a vendor to the “Archived” vendors list.
Delete Vendor - Delete/remove a vendor from the system. (Note: This will permanently delete the vendor from Dash. It is recommended that teams use the “Archive Vendor” function for most cases)
Adding Vendors
To add a vendor, click on the “Add Vendor” button in the top right of the Vendor page.
This will open up Add Vendor modal
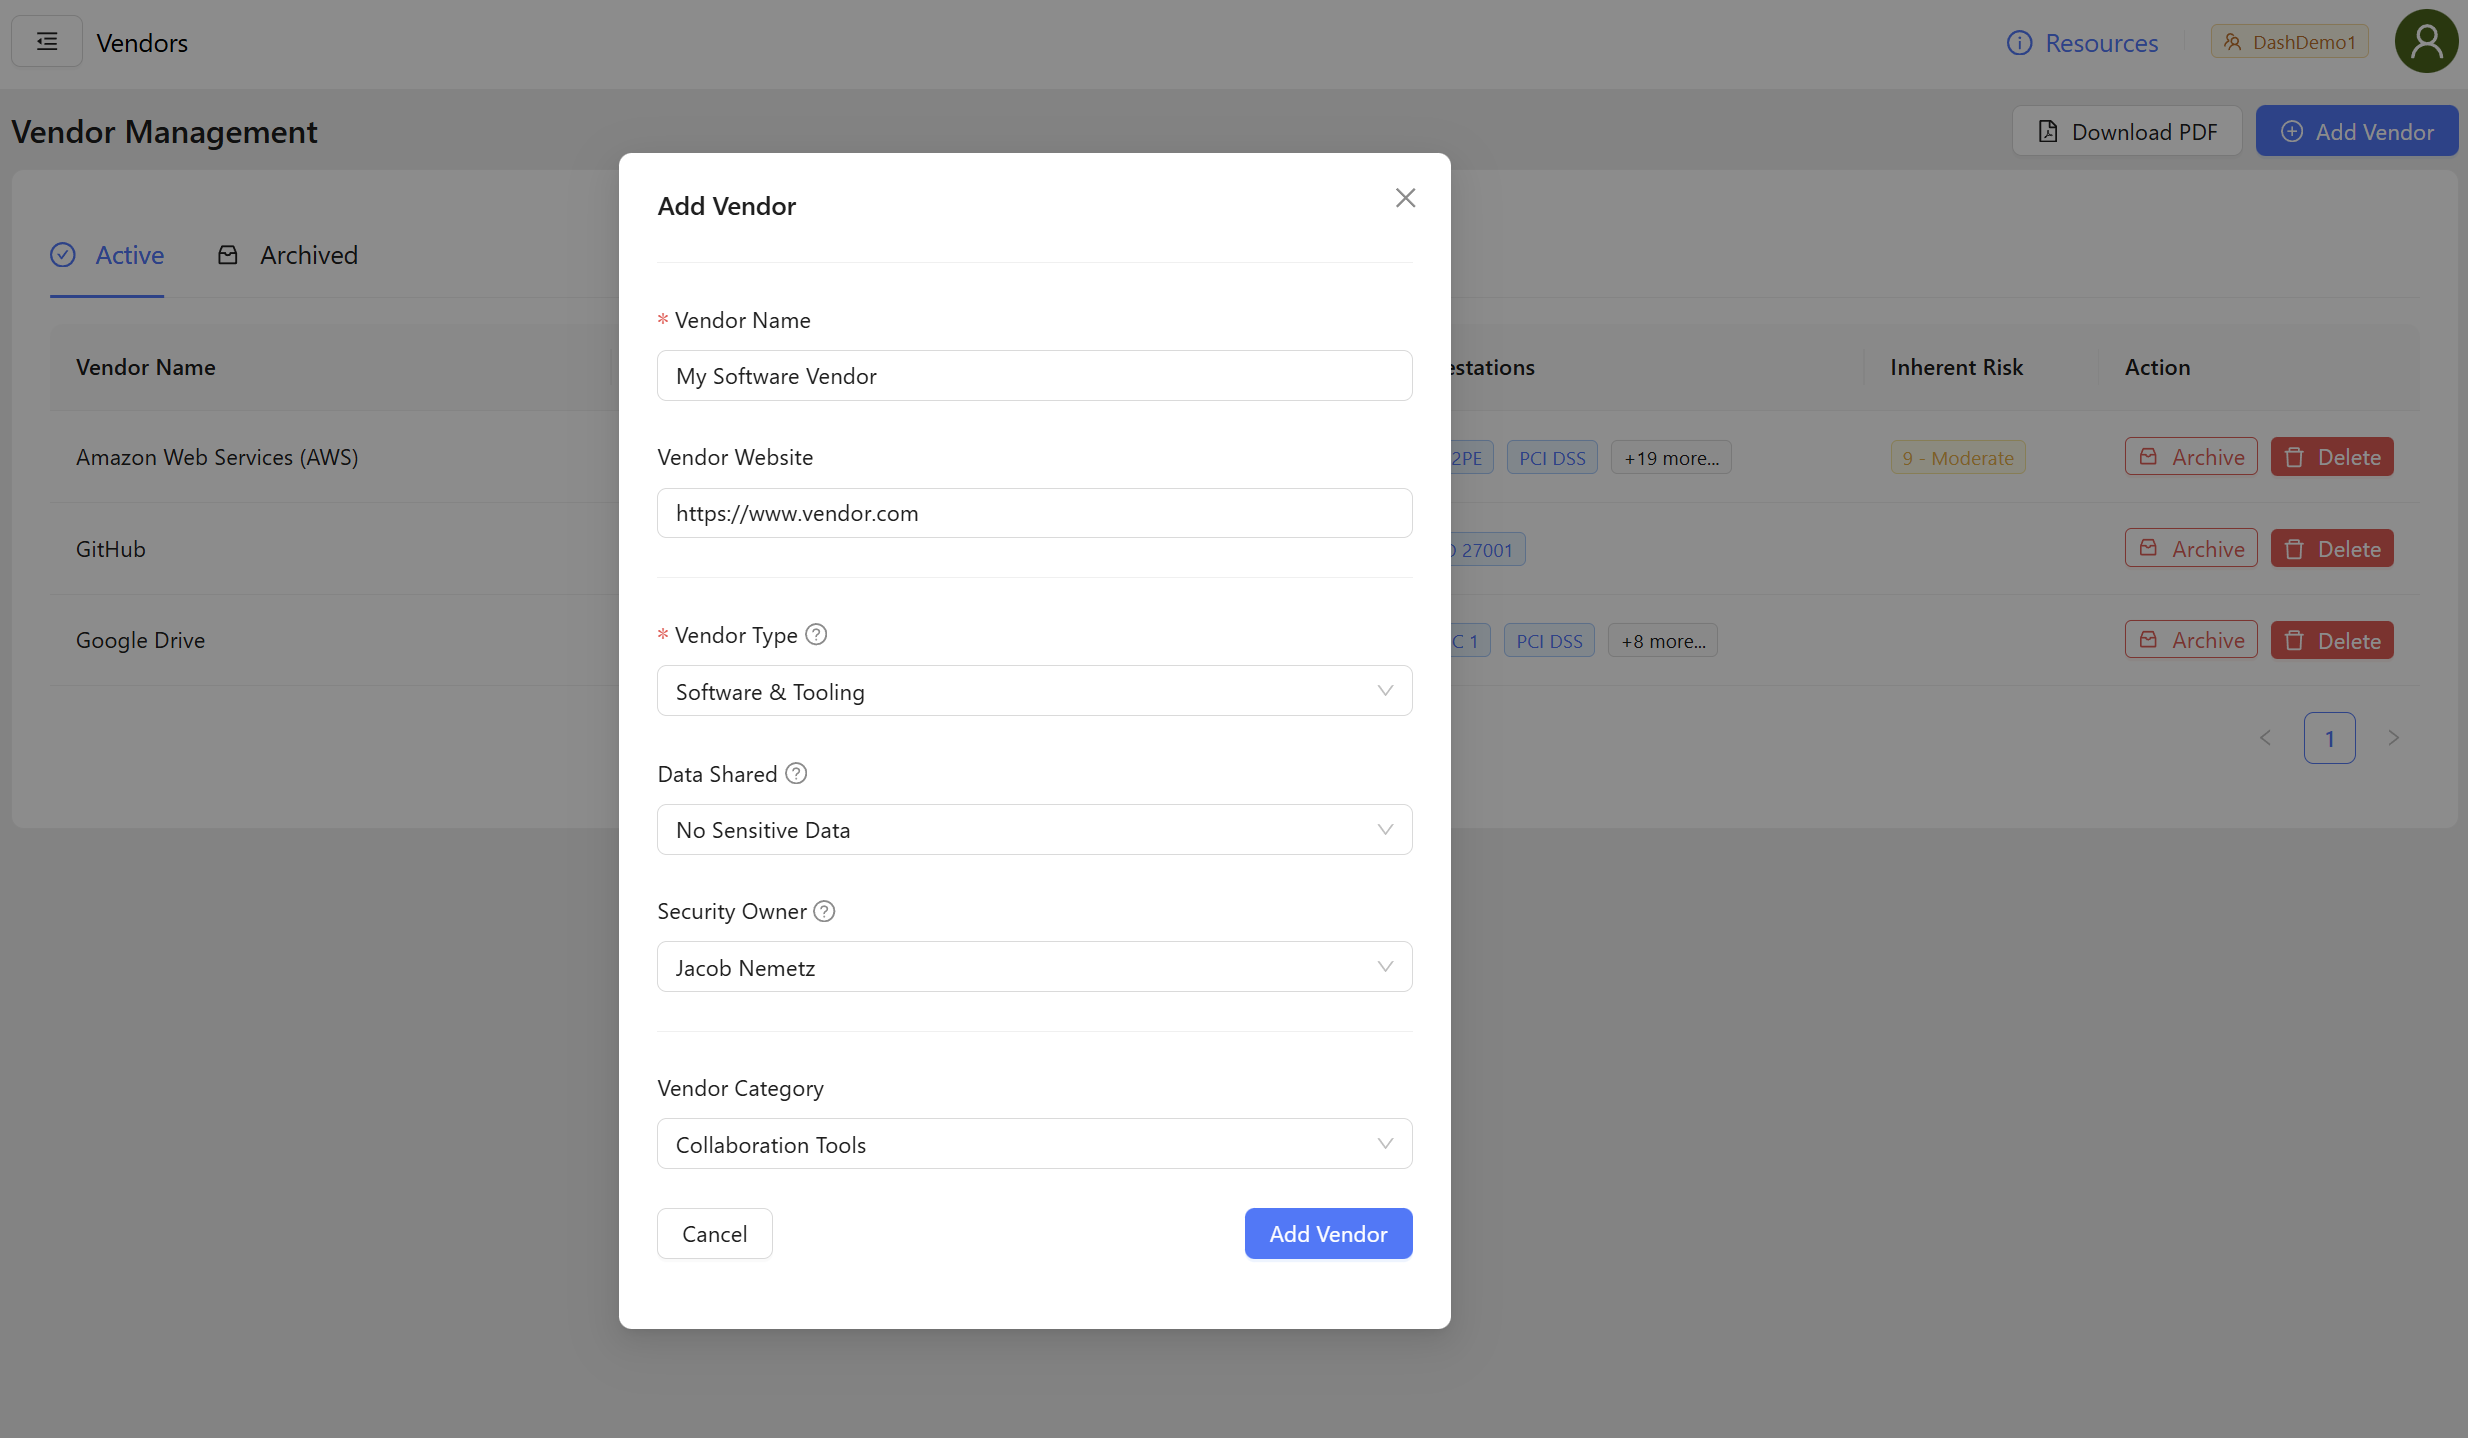
Add all relevant details on this vendor and click the “Add Vendor” button to create the vendor.
Certain vendors/solutions may be selected via the “Vendor Name” input and have specific information pre-populated, otherwise you may add a custom vendor and define details.
This will create a new vendor in the “Active” vendors area. Additional information for the vendor can be added by clicking on the new vendor in the list and editing vendor sections.
Editing Vendors
You can edit/add details relate to individual vendors by taking the following steps:
Click on the a vendor row that you would like to view/edit.

You will then be taken to the individual vendor page. (This may show certain blank sections or missing details if they have not been added before.)
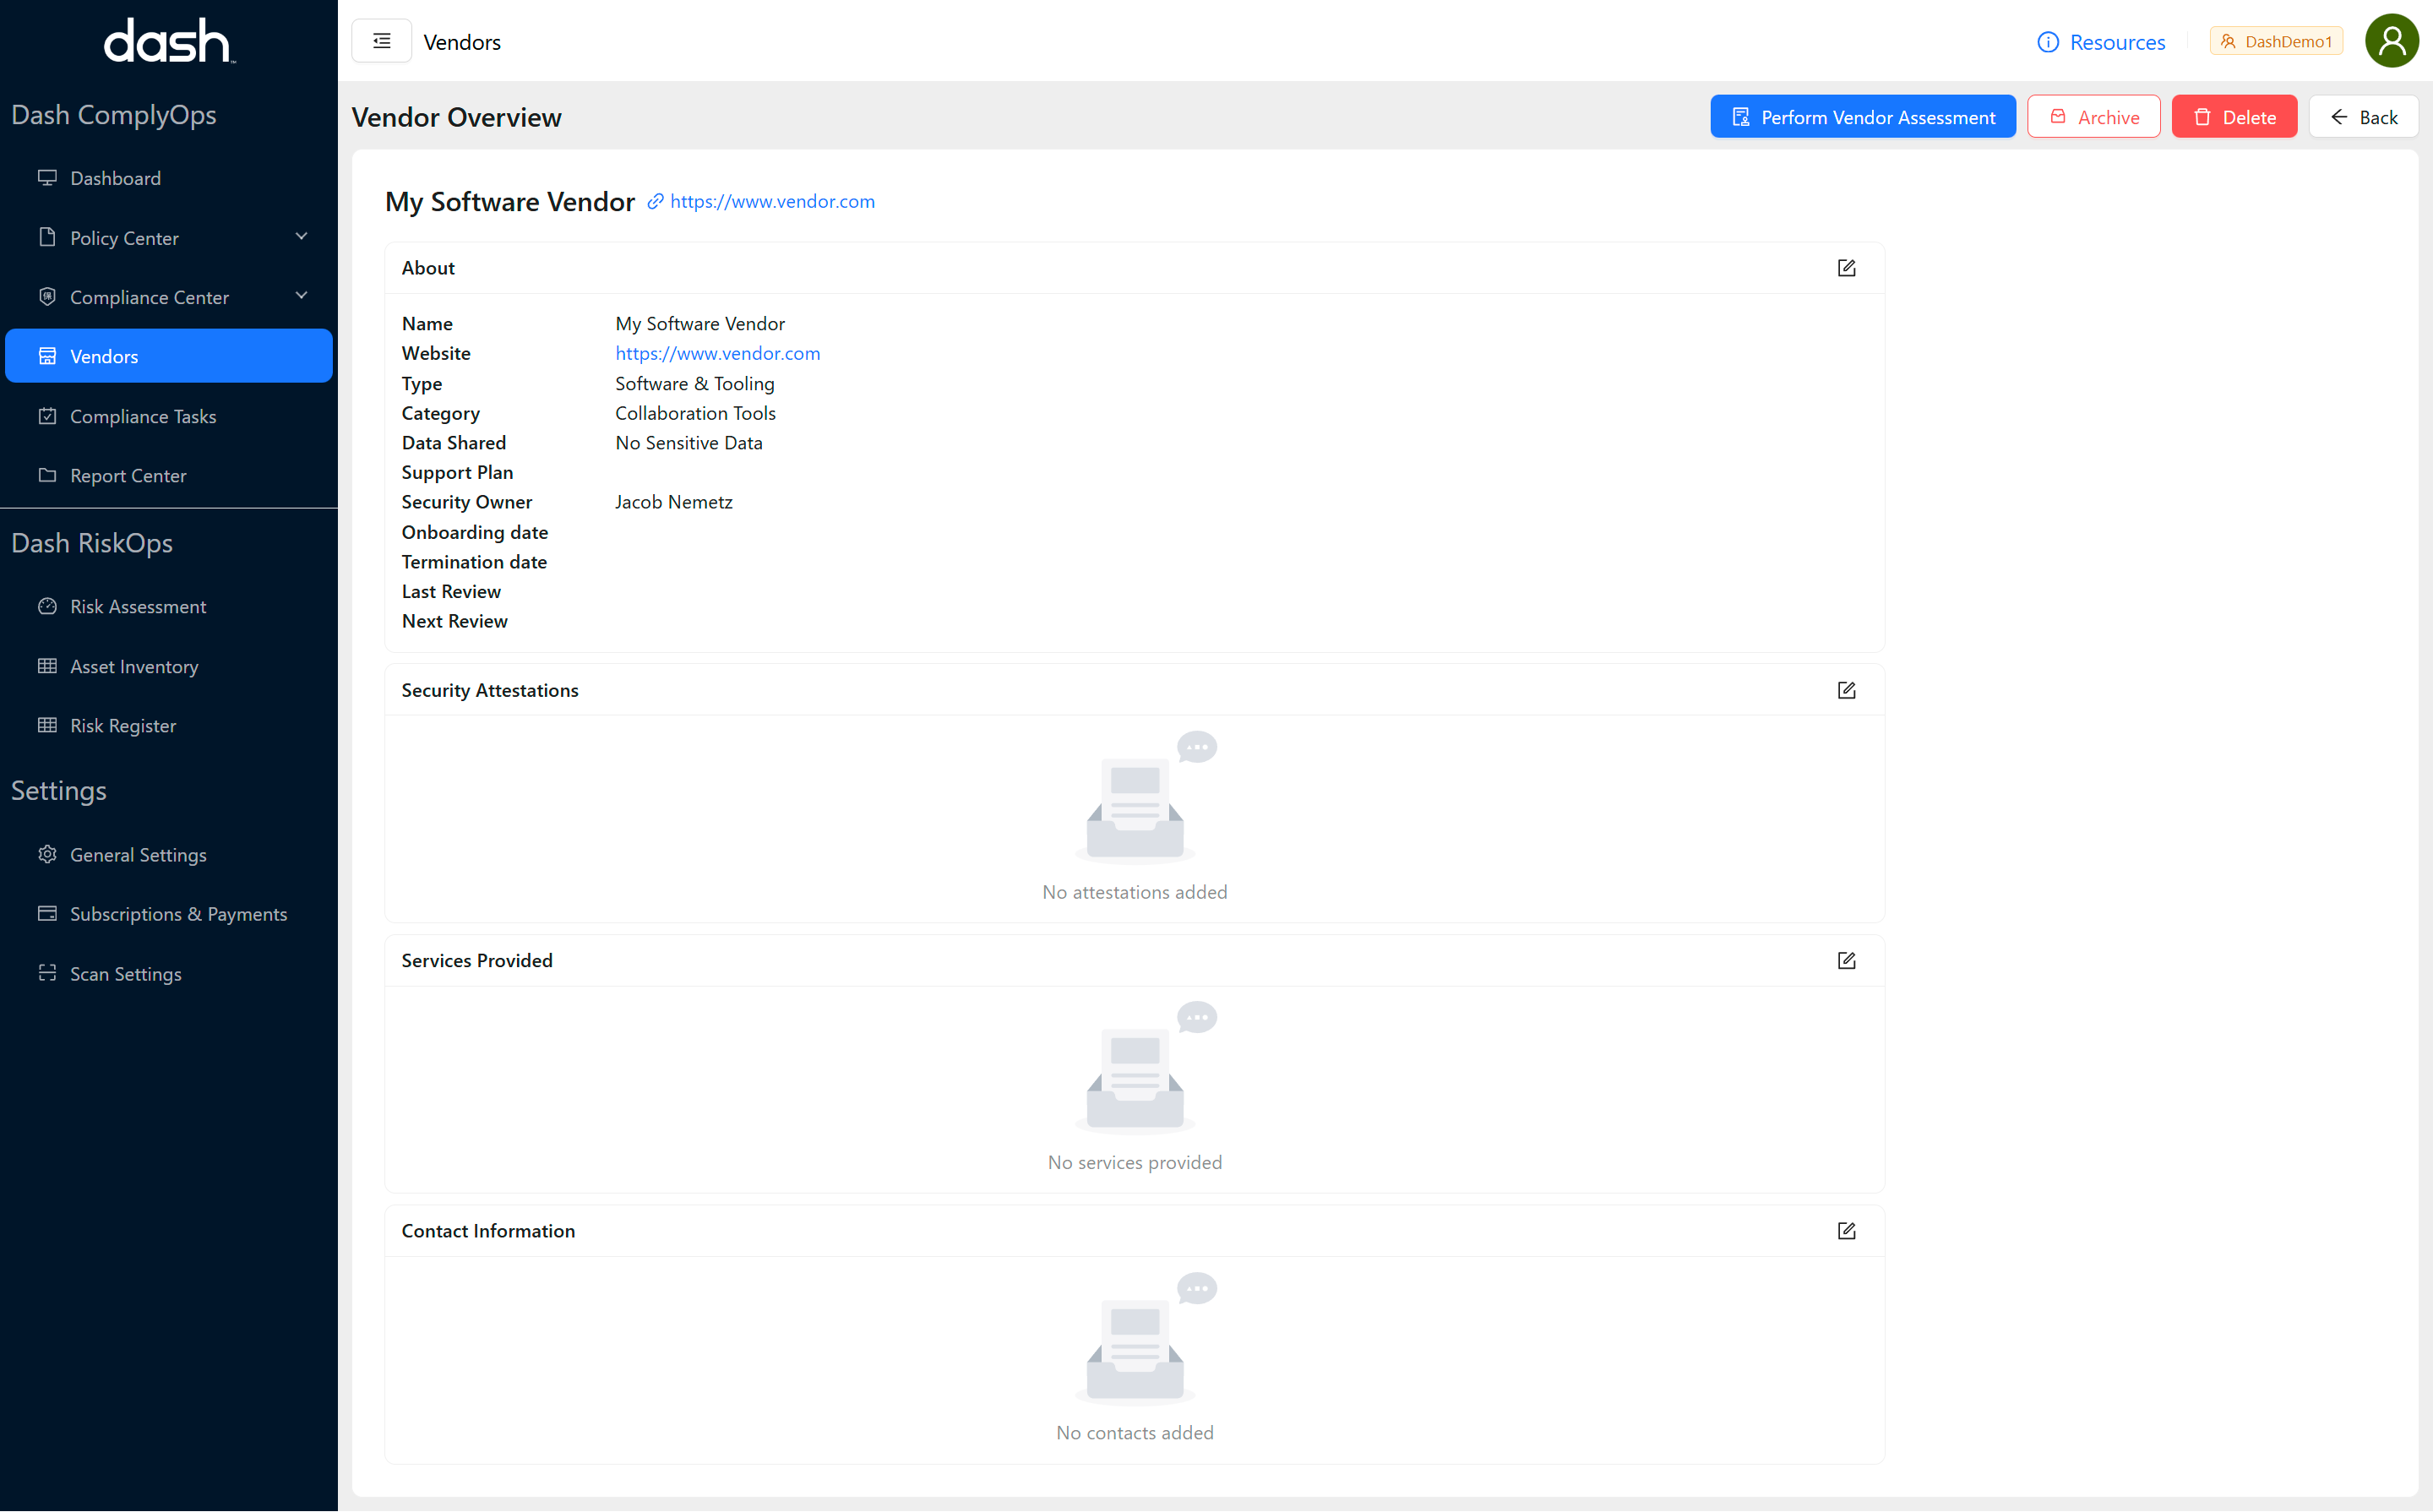
Click the Edit Icon next to the section section that you would like to edit details for (IE. “About”, “Security Attestations”, “Services Provided”, “Contact Information”)
The following information may be edited and managed inside the individual vendors area.
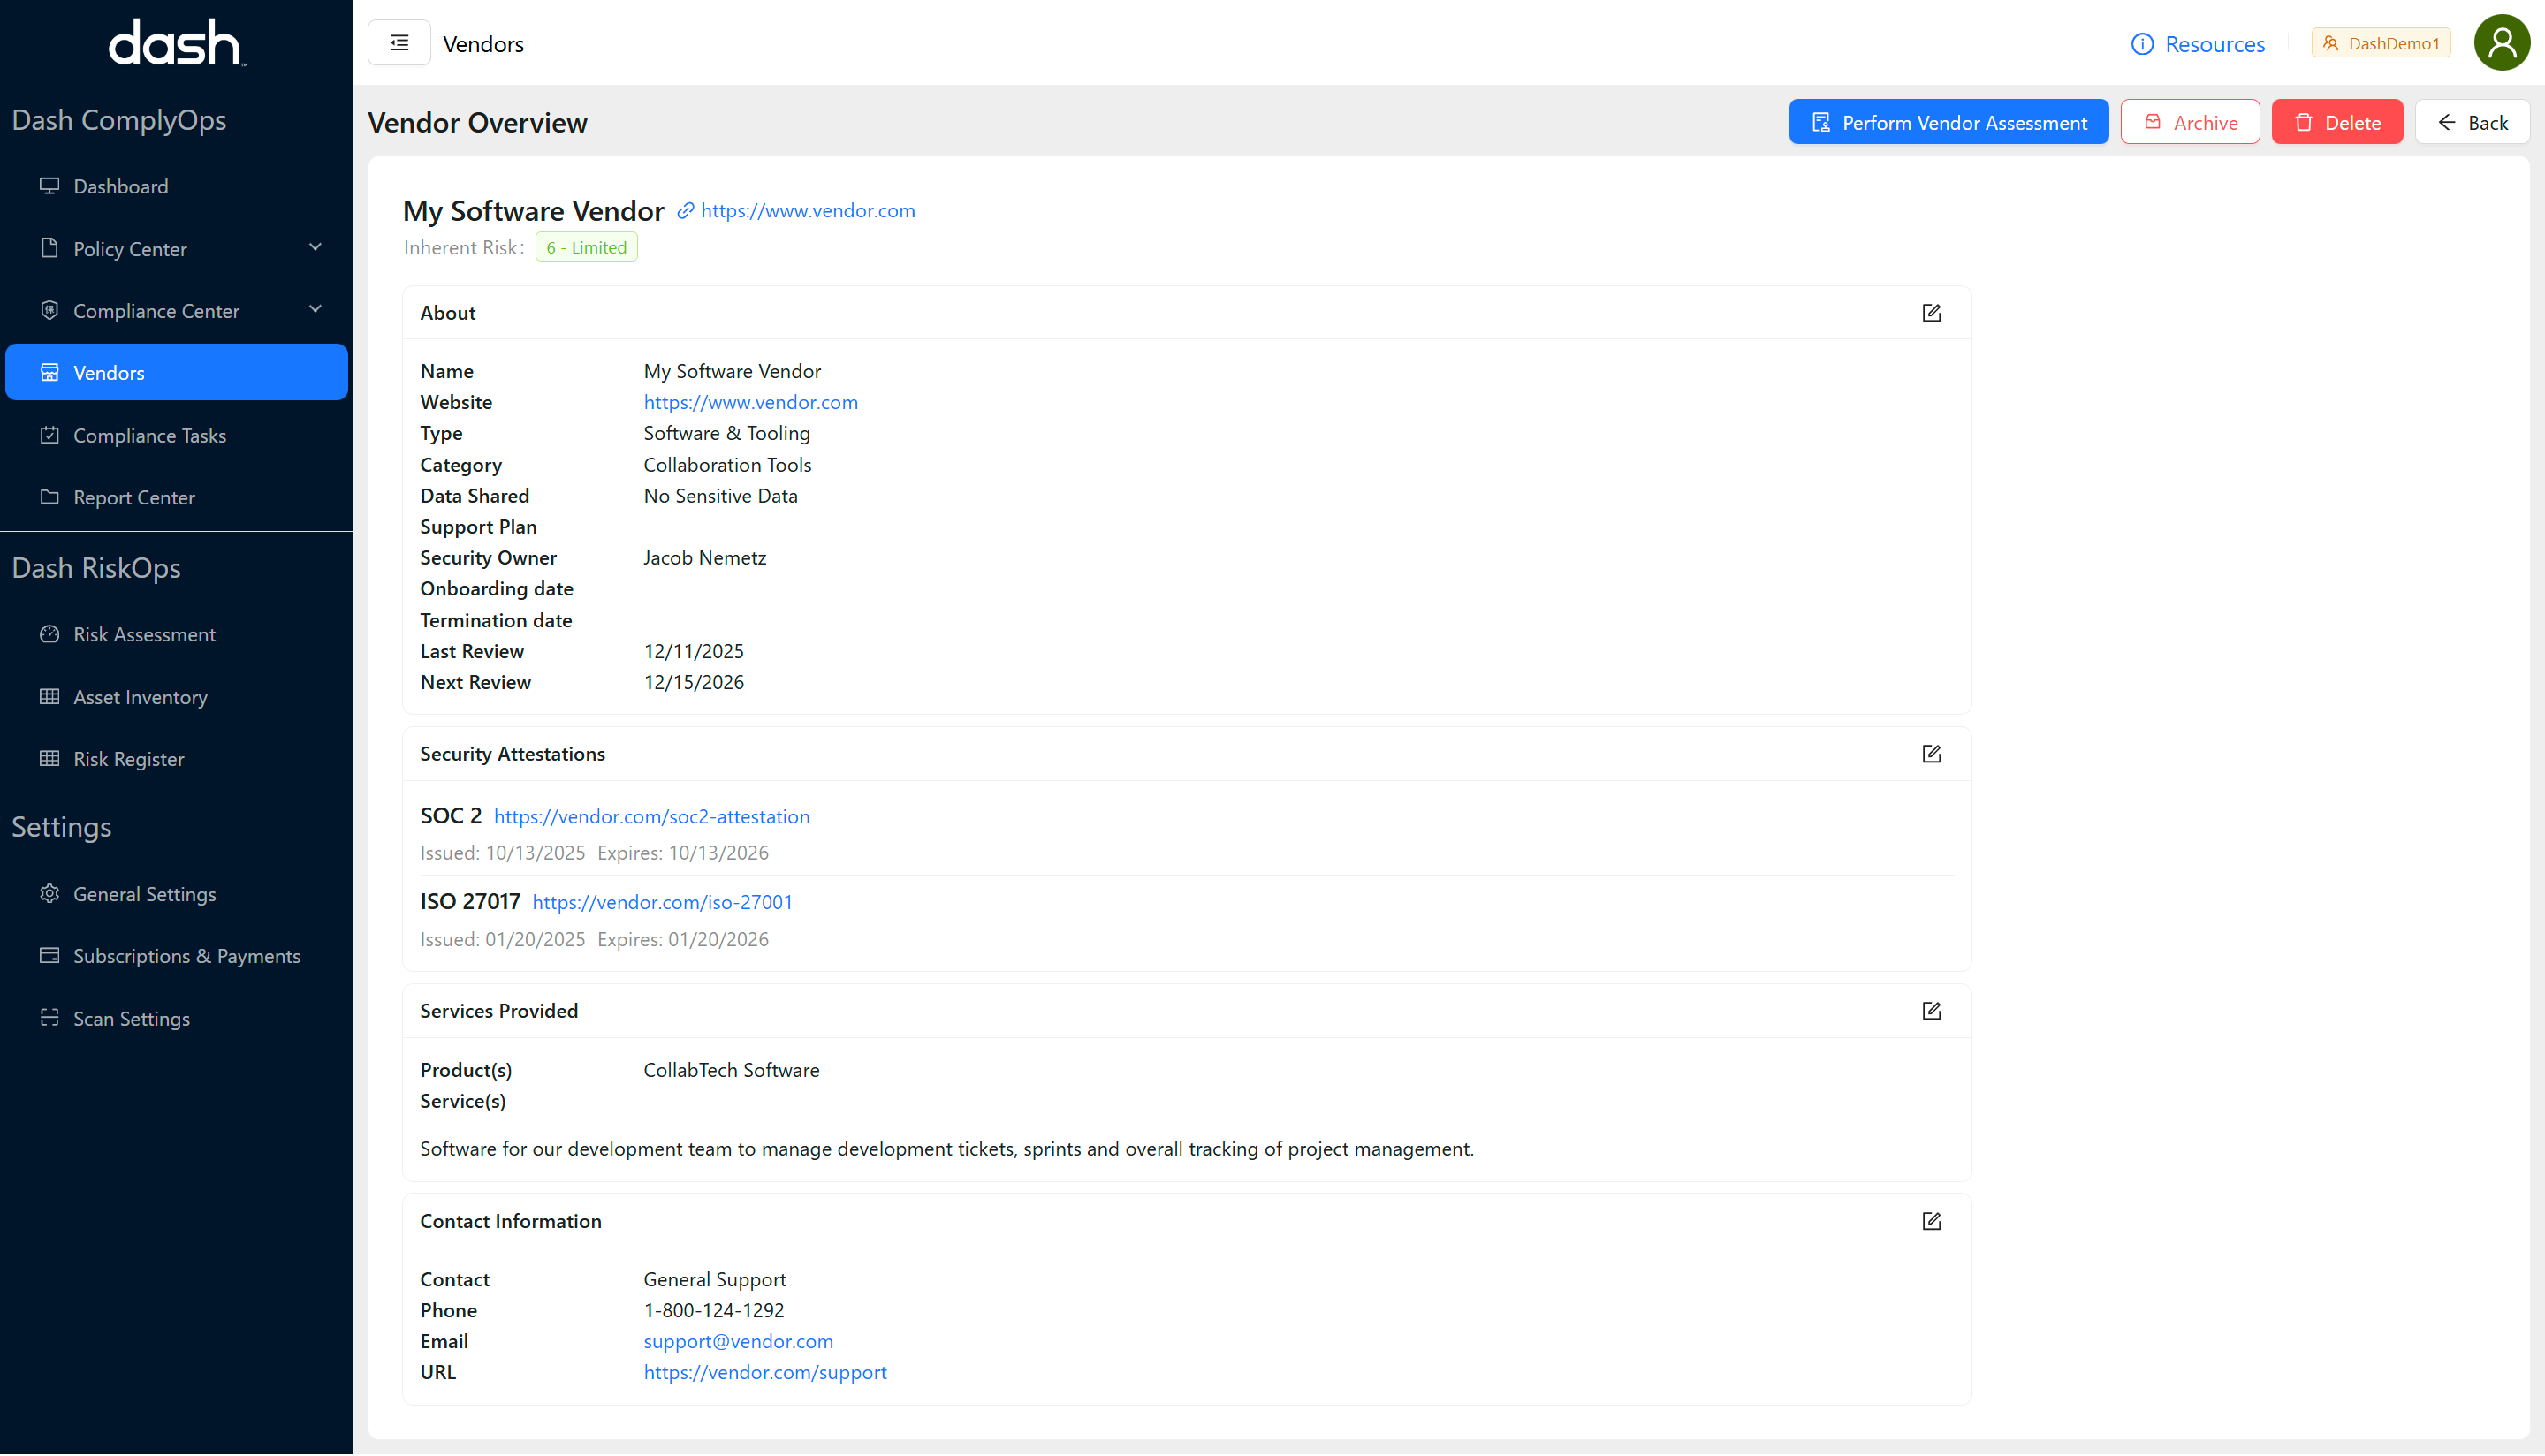
About:
Vendor Name* - Name of the vendor (IE. Amazon Web Services, Salesforce, ABC Consulting)
Vendor Website - Website of the vendor/service
Vendor Type* - The type of vendor related to the organization:
Software & Tooling - Software, solutions, online tools and services
Service Provider - Development, consulting, legal, or other professional services
Vendor Category - The type of vendor (IE. Cloud service provider, CRM/customer data platform, etc)
Data Shared - The type of data your organization shares with the vendor:
No Data - No organizational data is shared with the vendor
No Sensitive Data - Only non-sensitive (No PII/PHI or customer data) is shared with the vendor
Sensitive Data - Sensitive data is shared or hosted with the vendor (PII/PHI, customer data, etc)
Support Plan (as applicable) - Name any support plans your organization has with this vendor.
Security Owner - Define the security owner, or person responsible for overseeing this vendor and configuration.
Onboarding Date - The date when your organization started working with this vendor (or started tracking this vendor).
Termination Date (as applicable) - The date when your organization stopped working with this vendor.
Last Review - The last date the vendor information was reviewed and confirmed.
Next Review - The next date when the vendor’s information will be reviewed and confirmed.
Security Attestations:
Your team can track vendor security posture, by adding one or more security attestations for reference.
Attestation Name* - The name of the security attestation, certificate, or acknowledgment (IE. SOC 1, ISO 27001, etc)
URL - The url where this attestation can be found or where further guidance is provided around this security program.
Description - The description of the security attestation or scope of this security program.
Issuance Date - (As applicable) When was this security attestation issued .
Expiration Date - (As applicable) When does this security attestation expire/need to be updated.
Services Provided:
Products - Any products your organization has adopted related to this vendor (IE. G Suite, GMail, Google Drive, etc)
Services - Any professional services (or similar) your organization has adopted related to this vendor (IE. Accounting Package 1, etc)
Description - A description of products and services provided by this vendor to your organization.
Contact Information:
Your team can add information on one or more vendor contacts, and can include specific vendor emails and links/URLs for reference
Contact Name* - Name of the support contact (IE. “John Smith” or “Amazon Web Services Support”)
Phone - Phone number for support contact
Email - Email address for support contact (IE. john.smith@company.com, support@amazon.com)
URL - URL for support contact (IE. https://company.com/support)
Reviewing Vendors
Once you have added all appropriate vendor details, you may perform a periodic review or evaluation of the vendor and it’s security information. By default newly created vendors show a security status of “In Review”. Take the following steps to review vendors:
Click on the individual vendor row to review
On the individual vendor page > Click on the “Preform Vendor Assessment” button in the top right
The vendor review modal will appear.
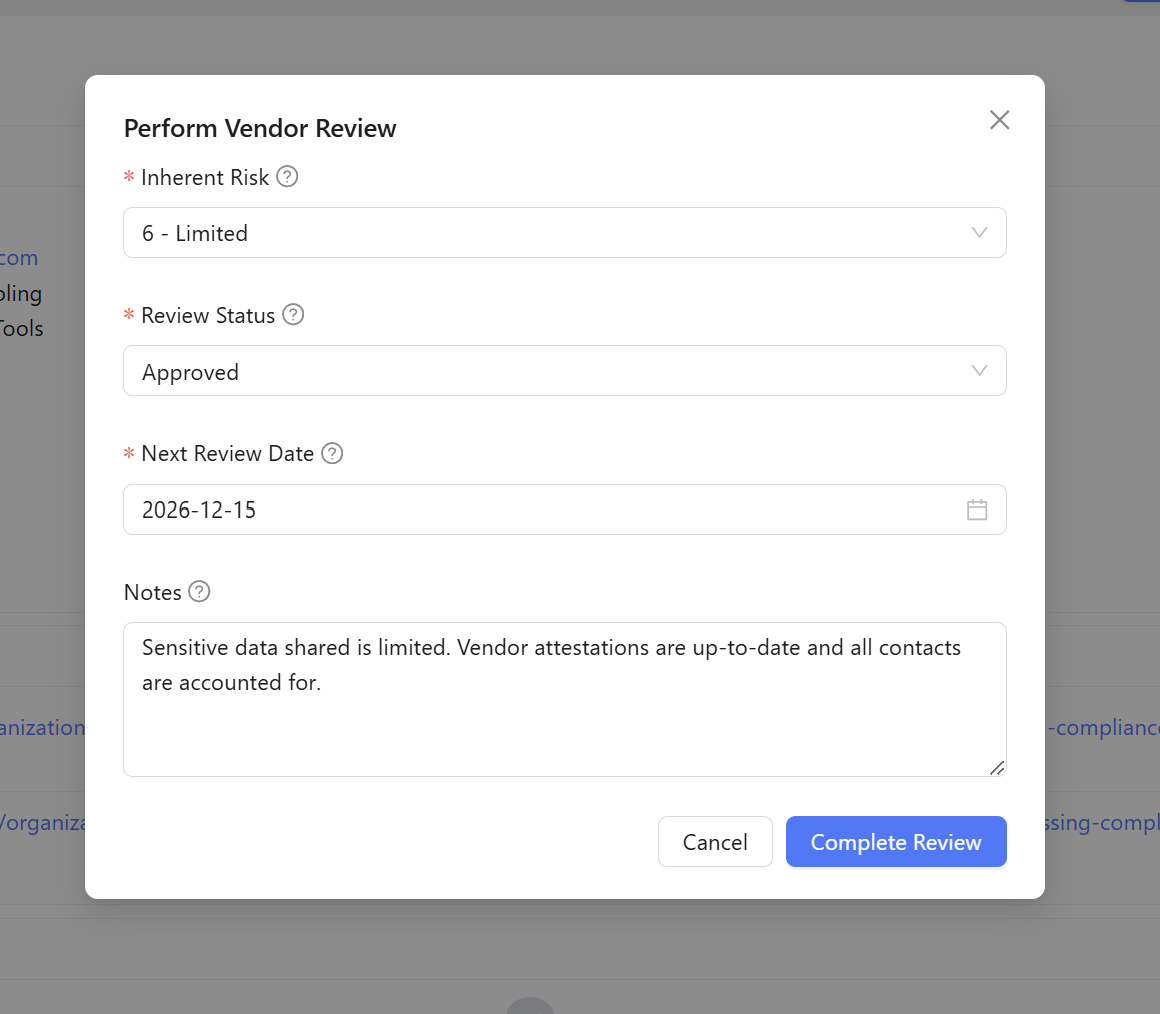
Add the following information to perform a review of the vendor:
Inherent Risk* - 1 (lowest risk) to 25 (highest risk)
This is the initial score you give based on data provided to this vendor,
Review Status* - Select the current state of the vendor evaluation.
Approved - Vendor has an appropriate security program, cataloged details, and has been approved by the organization.
Rejected - Vendor has been rejected and may be terminated/removed. (You may select this and later “Archive” the vendor if they are no longer in use)
Requires Followup - Vendor needs additional action, review, or correspondence. (This may be selected, and your team may review again later and moved to “Approved”)
Next Review Date* - Select a date for when the vendor should be reviewed again (typically vendors should be reviewed once a year or more frequently)
Notes - Add any other notes that you find relevant for the current vendor evaluation
Click the “Complete Review” button. After completing the review, the vendor’s status should be updated and context should be added to the vendor.

Your organization should perform this review action for all vendors listed periodically (as they are “In Review”)
Archiving Vendors
At any point you may “Archive” vendors that are no longer relevant to the organization. You may consider performing this action when vendors have been removed, terminated, or similar.
You may archive a vendor by taking the following actions:
Click the “Archive” button next to the applicable vendor row on the vendor list page
OR click the “Archive” button in the top left of the individual vendor page
Click “Yes” to confirm that you want to archive the vendor.
The vendor will be moved to the “Archived” section of the Vendors area
At any point you can “Un-archive” a vendor by going to the Vendor List > “Archived Vendor” page
Click the “Unarchive” button next to the vendor
Click “Yes” to confirm that you would like to “unarchive” the vendor and move it to the active vendor list.
Deleting Vendors
At any point you may “Delete” vendors that are no longer relevant to the organization. You may consider performing this action if you have created a vendor by mistake, have duplicate vendors, or have similar errors.
You may delete a vendor by taking the following actions:
Note: If this was a previously valid vendor or you want to be able to see vendor details later, you may want to “Archive” a vendor instead of “Deleting” a vendor.
Click the “Delete” button next to the applicable vendor row on the vendor list page.
OR click the “Delete” button in the top left of the individual vendor page.
Click “Yes” to confirm that you want to delete the vendor.
The vendor will be completely deleted/removed from the Vendors area.