
Deployment Guide
Introduction To Dash ComplyOps
Dash ComplyOps is solution for building, monitoring and maintaining security programs in Amazon Web Services (AWS). AWS customers can use Dash to set administrative policies and connect these policies to security controls and continuous compliance monitoring. Security Teams can use the Dash platform to set a security baseline and manage compliance programs for regulatory compliance standards including HIPAA and SOC 2. Organizations in regulated industries such as Healthcare and Finance, typically turn to Dash in order build a robust security program, maintain compliance standards and become prepare for upcoming security audits and assessments.
Dash is available as a single availability zone (AZ) solution and can be installed via CloudFormation. This architecture can be deployed with any support AWS region listed in the section “AWS Regions Supported For Installation” and has a number of configuration settings.
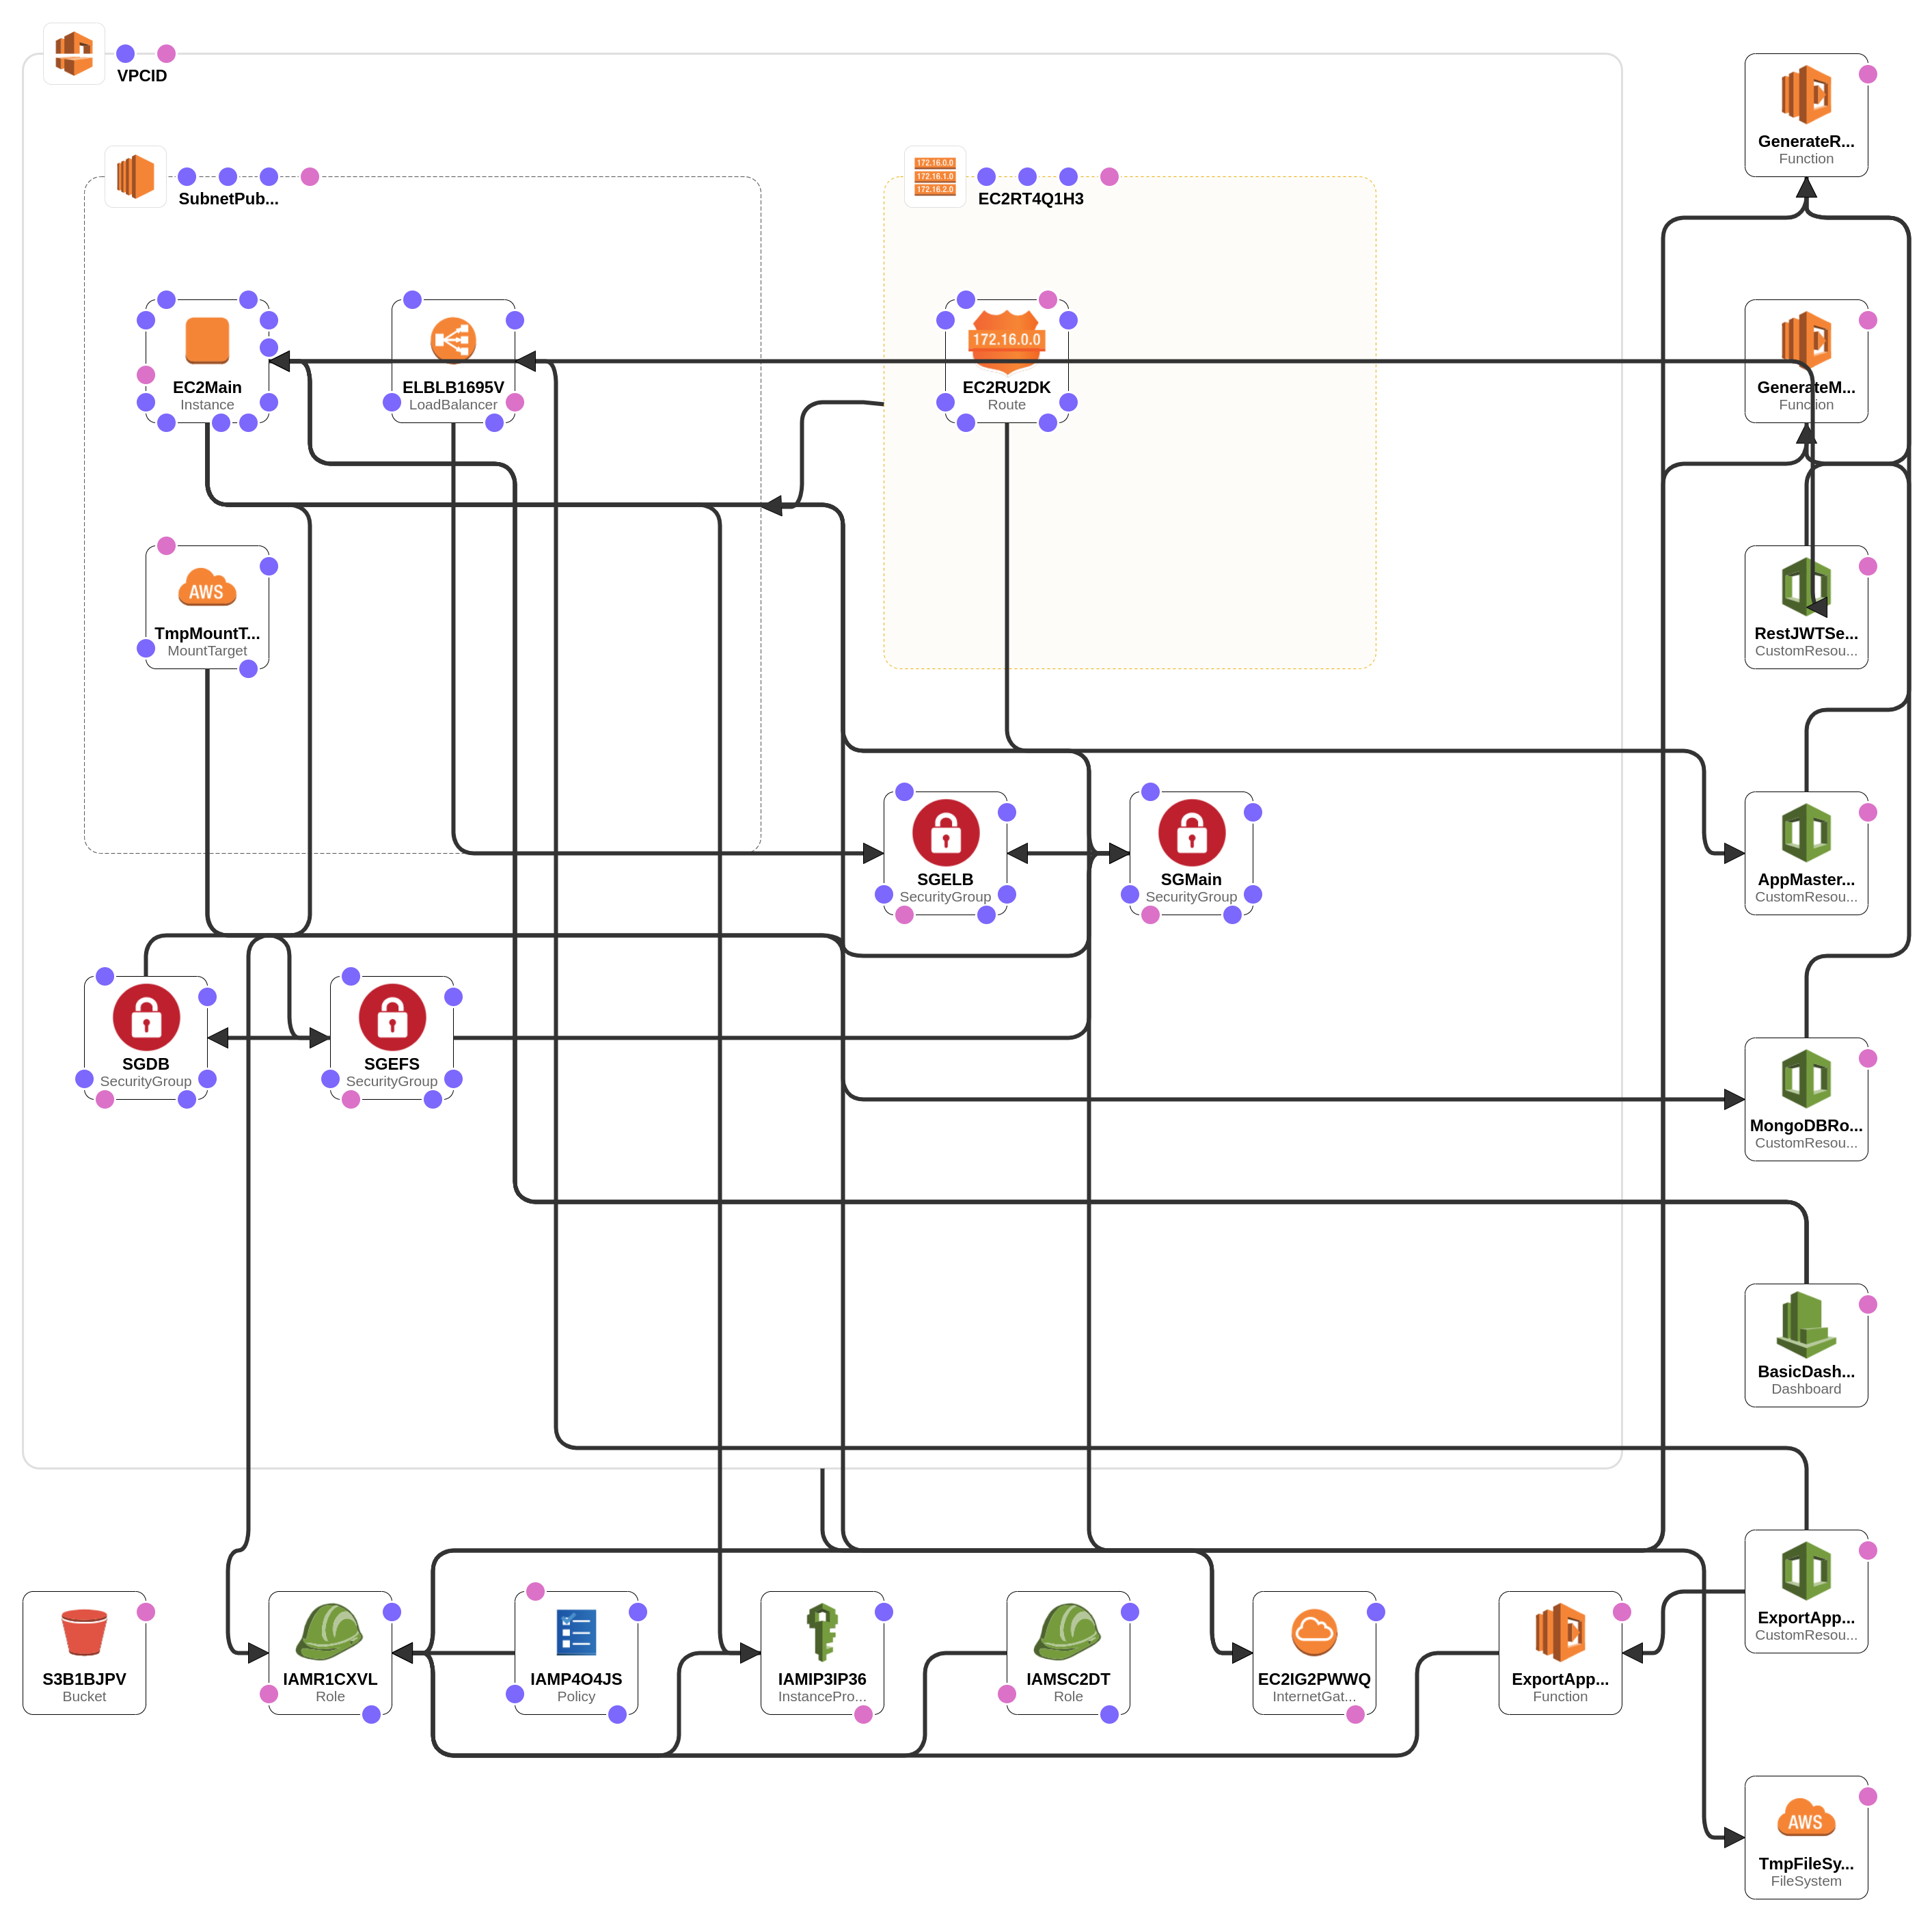
Once installation of Dash is complete, teams will have deployed the following architecture:
EC2 instance - For powering the Dash software application
EBS Volume - For storing application data and information
EFS - For storing application data
ELB Load Balancer - For accessing Dash application via endpoint url
S3 bucket - For storing backup application data
IAM role - For granting Dash specific monitoring permissions
Teams can get started with Dash, by installing Dash via the AWS Marketplace and deploying the Dash CloudFormation Template. This installation process generally takes around 20 minutes. Afterwards teams will be prepared to build and manage their cloud compliance in Dash ComplyOps. The Dash ComplyOps application is provided under the following license and agreement.
AWS Regions Supported For Installation
Dash ComplyOps is installed into a client’s AWS environment via installing a CloudFormation template. This template provisions the Dash application within your AWS environment.
Currently, Dash ComplyOps can be installed in the following AWS regions:
us-east-1us-east-2us-west-1us-west-2ap-northeast-1ap-northeast-2ap-southeast-1ap-southeast-2eu-central-1eu-west-1eu-west-2
Please Note: AWS GovCloud and AWS China Regions are currently not supported for Dash ComplyOps installation.
Dash Monitoring Supported Regions
Once installed, Dash automatically monitors your AWS cloud environment across all regions within your AWS account (regardless of which region it is installed into).
Please Note: AWS GovCloud and AWS China Regions are currently not supported for monitoring by the Dash ComplyOps application.
Dash Architecture and Requirements
During CloudFormation installation, Dash provisions an EC2 instance of type t3.medium and an gp2 EBS volume with 20gb of space. The default Instance and EBS sizing provided by Dash should meet the need of a majority of users, but if necessary, users can resize the Dash EC2 instance and EBS Volume to meet their needs.
The Dash EC2 instance and EBS volume must meet the following minimum requirements:
Instance size must be type t3.medium or larger
EBS volume must be type gp2 with size of 20gb or greater
This sizing should not be lowered, as it may limit performance or cause potential issues when using the application.
AWS User Requirements
Dash ComplyOps can be installed by a user with basic AWS skills and familiarity with CloudFormation.
In order to install Dash ComplyOps, An AWS user with appropriate permissions must install the Dash CloudFormation template. This should typically be a AWS Administrator or privileged user with the following AWS capabilities:
A current AWS User and login for the “Master” AWS Account
Access to the desired region to install the CF template.
IAM user permissions to install CloudFormation templates and perform the following AWS functions:
Create EC2 instances
Create/Edit S3 buckets
Create EFS resources
Create IAM roles (roles shown in this section)
Users with the correct permissions to install Dash can read the documentation for Installing Dash.
Please Note: For security reasons, AWS root user credentials should not be used to deploy or manage this application.
IAM Permissions Required For Installation
Installing software such as Dash requires assigning specific IAM permissions. Teams should consider following IAM best practices in order to maintain best security practices.
Teams should utilize only define the minimum necessary permissions when deploying and managing Dash. This means defining only assigning IAM permissions required for typical application functions. By default, deploying Dash via CloudFormation will assign a specific limited set of permissions shown below, users should limit adding unnecessary to ensure least privilege.
AWS Monitoring Permissions
Dash uses the following permissions are used to scan and monitor your AWS account for security issues. These permissions are are also used with any connect AWS accounts with the Dash application:
"arn:aws:iam::aws:policy/AmazonEC2ReadOnlyAccess","arn:aws:iam::aws:policy/AmazonVPCReadOnlyAccess","arn:aws:iam::aws:policy/SecurityAudit","arn:aws:iam::aws:policy/AmazonS3ReadOnlyAccess","arn:aws:iam::aws:policy/AmazonRDSReadOnlyAccess","arn:aws:iam::aws:policy/AWSLambda_ReadOnlyAccess","arn:aws:iam::aws:policy/IAMReadOnlyAccess"
Installed IAM Role and Permissions
The Dash ComplyOps CloudFormation template provisions resources including an IAM role. This IAM role grants Dash permissions to read AWS configuration information within your environment.
Permissions are granted to enable Dash ComplyOps to perform the following actions:
Automatic backups (of Dash data to an S3 bucket)
Connecting/viewing findings from AWS Config
Optional Auto-remediations
The following IAM role permissions are created when installing Dash via CloudFormation template:
{
  "Effect": "Allow",
  "Action": [
    "s3:CreateBucket",
    "s3:DeleteObject",
    "s3:ListAllMyBuckets",
    "s3:ListBucket",
    "s3:PutObject",
    "s3:PutObjectAcl",
    "s3:GetObject",
    "s3:GetBucketPolicy"
  ],
  "Resource": "arn:aws:s3:::*"
},
{
  "Effect": "Allow",
  "Action": [
    "rds:ModifyDBInstance",
    "rds:describeDBInstances"
  ],
  "Resource": "*"
},
{
  "Effect": "Allow",
  "Action": [
    "cloudformation:ListStackResources"
  ],
  "Resource": "*"
},
{
  "Effect": "Allow",
  "Action": [
    "s3:PutBucketLogging",
    "s3:GetBucketLogging",
    "s3:PutBucketAcl",
    "s3:GetBucketAcl"
  ],
  "Resource": "arn:aws:s3:::*"
},
{
  "Effect": "Allow",
  "Action": [
    "ec2:RevokeSecurityGroupIngress",
    "ec2:AuthorizeSecurityGroupIngress",
    "ec2:Describe*",
    "ec2:CreateSnapshot",
    "ec2:CreateTags",
    "ec2:DeleteSnapshot",
    "ec2:CreateFlowLogs",
    "ec2:DeleteFlowLogs"
  ],
  "Resource": "*"
},
{
  "Effect": "Allow",
  "Action": [
    "iam:UpdateAccountPasswordPolicy",
    "iam:GenerateCredentialReport",
    "iam:GenerateServiceLastAccessedDetails",
    "iam:Get*",
    "iam:List*",
    "iam:SimulateCustomPolicy",
    "iam:SimulatePrincipalPolicy"
  ],
  "Resource": "*"
},
{
  "Effect": "Allow",
  "Action": [
    "organizations:Describe*",
    "organizations:List*"
  ],
  "Resource": "*"
},
{
  "Effect": "Allow",
  "Action": [
    "cloudwatch:PutMetricData"
  ],
  "Resource": "*"
},
{
  "Effect": "Allow",
  "Action": [
    "events:PutEvents",
    "events:listRules"
  ],
  "Resource": "*"
},
{
  "Effect": "Allow",
  "Action": [
    "config:describeDeliveryChannels",
    "config:describeConfigRules",
    "config:putDeliveryChannel",
    "config:DeleteEvaluationResults",
    "config:StartConfigRulesEvaluation",
    "config:PutConfigRule",
    "config:DeleteConfigRule"
  ],
  "Resource": "*"
},
{
  "Effect": "Allow",
  "Action": [
    "sns:ListSubscriptionsByTopic",
    "sns:listTopics",
    "sns:createTopic",
    "sns:subscribe",
    "sns:unsubscribe",
    "sns:confirmSubscription"
  ],
  "Resource": "*"
},
{
  "Effect": "Allow",
  "Action": [
    "logs:PutLogEvents",
    "logs:DescribeLogGroups",
    "logs:DescribeLogStreams",
    "logs:CreateLogGroup",
    "logs:CreateLogStream"
  ],
  "Resource": "*"
},
{
  "Effect": "Allow",
  "Action": [
    "autoscaling:DescribeAutoScalingGroups",
    "autoscaling:DescribeLaunchConfigurations"
  ],
  "Resource": "*"
},
{
  "Effect": "Allow",
  "Action": [
    "lambda:ListFunctions"
  ],
  "Resource": "*"
},
{
  "Effect": "Allow",
  "Action": [
    "glacier:listVaults"
  ],
  "Resource": "*"
},
{
  "Effect": "Allow",
  "Action": [
    "cloudtrail:DescribeTrails"
  ],
  "Resource": "*"
},
{
  "Effect": "Allow",
  "Action": [
    "elasticloadbalancing:DescribeLoadBalancers",
    "kms:ListKeys",
    "dynamodb:ListTables"
  ],
  "Resource": "*"
},
{
  "Effect": "Allow",
  "Action": [
    "kms:ListKeys",
    "dynamodb:ListTables"
  ],
  "Resource": "*"
},
{
  "Effect": "Allow",
  "Action": [
    "dynamodb:ListTables"
  ],
  "Resource": "*"
},
{
  "Effect": "Allow",
  "Action": [
    "sts:AssumeRole"
  ],
  "Resource": "*"
}
Deployment & Installation
Keypairs
During CloudFormation installation, you will be asked to define a keypair for the application stack:
This keypair can be created in the current region’s EC2 → Keypairs.
Keypairs from the current AWS region may be selected where the application stack is being deployed.
All keypairs and .pem files created by your team must be managed and securely stored by your organization.
The defined keypair for the Dash application stack will be associated with the created Dash EC2 instance and can be used by your team to SSH into the created Dash EC2 instance.
Instructions for Deploying Dash ComplyOps
Dash ComplyOps can be installed via the AWS Marketplace and CloudFormation Stack install. Teams can read the full Dash installation documentation and take the following steps to install and deploy the Dash ComplyOps application:
The current Dash ComplyOps application can be currently deployed as a single-AZ application. The application stack can be installed to any supported region listed in the “AWS Regions Supported For Installation” Section. Instance/Disk sizing can be changed to meet different needs.
Log into AWS account and pick your preferred region.
When setting up Dash ComplyOps, you must use the MASTER account in AWS. This is typically the first account your organization sets up. You can verify the master account by clicking the avatar in the top right corner and clicking ‘My Organization‘. You should see a table of accounts. The master account will have a tag next to it stating it is the master account. You must use that account to perform the set up.
Create an application-specific pem key. This is done in the EC2 module. You will need to create this pem key in the region/availability zone that you will be deploying the Dash CloudFormation template. Make sure to keep this pem key accessible for future use. You will need to use that pem key to SSH in if needed. By default, SSH access is disabled but can be opened up if needed of course.
Go to AWS Marketplace and navigate to the Dash ComplyOps Offering.
Click the “Continue to Subscribe” button. You will be presented with a modal. Click the “Set Up Your Account” button.
You will be directed to a form page. Please enter your team’s:
Organization Name
Organization Contact Email (This email will need to be accessible to complete installation)
Contact Name
Contact Phone
Click the “Submit” button.
On completion of this form, you will see a message that this step is complete.
You will now receive an email in your inbox with further licensing needed for installation. In another tab or browser window, please navigate to the previously entered email and open the most recent Dash ComplyOps email. (It may take 5 minutes or so to receive this email. If you cannot find this email, you may check your Spam folder.)
In the Dash email, click the button to download the CloudFormation template. This will download a file to your computer for the next installation steps.
Now navigate to CloudFormation in the AWS console.
In CloudFormation click the “Create Stack” button. Then click “With new resources (standard)”
Under the Specify template section, select “Upload a template file” for the Template Source.
Then upload the CloudFormation template file you downloaded in the email in Step #9.
Then click the “Next” button.
Go to next page, and fill out the form on this page.
Most fields have default values that are appropriate to stick with. Otherwise, provide a value that makes sense for your environment.
Once you have filled out the form, click “Next”.
Scroll to bottom and click “Next”.
Scroll to bottom and check the box – “I acknowledge that AWS CloudFormation might create IAM resources with custom names.“
Then click the “Create stack” button
The process will take a few minutes.
Once the CloudFormation stack has the status CREATE_COMPLETE, you will be able to access the Dash Application by copying the link from the CloudFormation Outputs tab.
Note: It may take another couple minutes for the application to be provisioned, initialized, and display at the Output URL.
Application Initialization
Go to the EndpointURL link provided in the CloudFormation Output tab.
The application may take up to 5 minutes to start up.
Once the application loads, it will look like this:
Organization Validation – Put in the organization id and license code to validate your organization
Create New User – Put in an appropriate email and password for the first user
AWS Account Configuration – In this step, we will validate the AWS cloud setup and make sure that all permissions are established properly.
Final Step – Click ‘Next’ to sign in.
At this point, you can log in and use the application.
Testing The Application
Once the Dash application stack is installed, you can check that Dash functions and appears as expected:
Navigate to the Endpoint URL in your web browser, you should see the Dash ComplyOps login (or initial signup process)
Login to Dash using user credentials, you should see the Dash home dashboard.
You can browse security findings in the “Compliance Center” and view Policy materials in the “Policy Center”
If the Dash application pages do not appear as usual, consider taking the following steps:
Clear your browser cache and sight application data → Refresh the page and see if the Dash application now functions as expected
Consider troubleshooting steps described under the “Emergency Maintenance” section
Submit a support ticket to the Dash team.
Application Stack Configuration
Network Configuration
VPC - By default, the Dash ComplyOps deployment creates a new VPC containing Dash application resources. Inside the Dash VPC is the following:
Subnet - A subnet is created inside the Dash created VPC. This subnet has a default subnet NACL allowing inbound and outbound traffic. These NACLs can be further configured after deployment. This subnet contains the following resources:
EC2 instance
Security group (Main) - Opens port 443 and port 80 to the ELB security group
Security Group (Main) - Opens port 27017 to instance
Elastic Load Balancer (ELB)
Listeners- Ports 443 and port 80. After establishing an SSL/TLS connect, port 80 may be closed.
EFS
Security Group - Opens port 2049 to the database security group
Maximizing Availability
After deploying the Dash ComplyOps stack, you may consider taking the following steps to maximize uptime and availability.
Confirm that automatic backups are being created in Dash ComplyOps
Login to the Dash application
Navigate to Settings → Backup and Restore
Click “Restore backup” and confirm that daily backups are available
Confirm that EC2 status checks are active and are positive
In the AWS console, navigate to EC2 and find the Dash instance (or find the Dash EC2 instance ID in the CloudFormation “Resources” tab)
Select the Dash instance
Ensure that both checks are not failing
Enable detailed monitoring for the EC2 instance
Navigate to EC2 → Select the Dash instance
Choose “Actions, Monitoring, Manage detailed monitoring”
On Detailed Monitoring → Select “Enable” checkbox → Save
Create CloudWatch Alarms
CloudWatch can automatically monitor instance metrics and send you a notification when a metric hits a specific threshold.
We recommend creating alarms around StatusCheckFailed and CPUUtilization metrics. (Alert when StatusCheckFailed = 1 | Alert when CPUUtilization > 80%)
Resize instance to larger size if CPU > 80%
If CPU usage is higher than 80%, we recommend resizing Dash to a larger instance size/type.
Sensitive Data
Dash ComplyOps stores certain sensitive application data in the following resources associated with the CloudFormation stack:
EBS Volume - Stores information including Dash findings and basic user information.
S3 Bucket - Stores backups and backup data (if needed for disaster recovery).
Data Encryption Settings
Dash ComplyOps provides the following options for encrypting application resources:
EBS Volume - By default, the Dash deployed EBS volume is created with “EBS volume encryption” enabled.
S3 Bucket - By default, the Dash deployed S3 bucket is created “S3 server-side encryption” enabled, default S3 encryption settings should be automatically enabled.
Billing
After installing Dash via CloudFormation, your organization will be granted a 7-day free trial of the software application.
After the free trial period ends, Dash will meter and bill your organization based on the number of AWS resources located in your AWS installation account. By installing Dash ComplyOps via the AWS Marketplace, you agree to the following billing structure.
All listed resources are measured and billed on an hourly basis:
Resource | Cost |
|---|---|
The number of EC2 instances in the environment | $0.053 / unit |
The number of S3 buckets in the environment | $0.006 / unit |
The number of RDS instances in the environment | $0.067 / unit |
The number of Lambda functions in the environment | $0.002 / unit |
The number of VPCs in the environment | $0.013 / unit |
The number of Classic Load Balancers and V2 load balancers | $0.013 / unit |
The number of Autoscaling Groups in the environment | $0.013 / unit |
The number of CloudWatch rules in the environment | $0.013 / unit |
The number of CloudTrail trails in the environment | $0.013 / unit |
The number of SNS Topics in the environment | $0.013 / unit |
The number of IAM Users in the environment | $0.006 / unit |
The number of Base Services in the environment | $0.001 / unit |
Backup and Recovery
After installing the Dash ComplyOps stack, Dash will perform automatic backups of your application and store these backups in S3. Teams can create custom backups and restore from backups at anytime.
Backing Up Data
By default, Dash will automatically create backups of Dash ComplyOps data to an independent S3 bucket on a daily basis. Backups are stored and rotated/deleted after 90 days. After installing Dash, these backups will occur automatically without additional configuration. Your team can view these backups by navigating to Amazon S3 and searching for the S3 bucket named “dash-backup…”
In addition, your team can manually create a backup of your application data at any point, by following these steps:
Login to your Dash application and navigate to the Settings Page.
Click on “Backup and Restore” in the Settings menu options.
Click the “Create Backup” button. A loading screen will appear for 10 seconds or longer. Dash may take a few minutes to backup the application data. You can check on the status of the backup by refreshing the settings page a few minutes later.
Confirm that your backup has been created by clicking on the “Restore Backup” button. You should be able to see a backup listed with the most recent creation time in the popup modal.
Restoring Data
In-case of data-loss, organizations may restore Dash application data by restoring from a previously created backup. To restore your application data perform the following steps:
Login to your Dash application and navigate to the Settings Page.
Click on “Backup and Restore” in the Settings menu options.
Click the “Restore backup” button. A modal will appear with a list of previously created backups that may be used as restore points.
Select the Backup point you would like to use as your restore point for Dash. Note: All current application data will be replaced with the data from the selected backup file.
Enter your Dash account password and click the “Restore Data” button. The restore process will begin and may take a few moments. You will be logged out of Dash. Once complete, you can log into Dash and the application will be restored to the latest backup point.
Restoring After Instance Failure
In case of an instance failure or service failure, your team can restore functionality deploying a new CloudFormation stack and restoring data from a backup:
View Backup In S3 -
Navigate to S3 and select the bucket beginning with prefix dash-backup.
Open the S3 bucket and look for the latest backup .tar object.
You should see a backup file dated from the last day.
Deploy New Stack - After confirming the status of latest backup file, you can start deploying a new stack
Before redeploying the stack, you may want to reach out to Dash Support to potential confirm next steps.
Navigate to your current Dash CF stack → Under the “Parameters” tab, note the LicenseKey and OrganizationId for later (you can also find these in the initial Dash subscription email)
Remove the current Dash CloudFormation Stack
Create a new CloudFormation stack → Create stack from new resources
Deploy the latest template of Dash ComplyOps (using your current LicenseKey and OrganizationID)
Complete The Dash Initial Setup -
After CF stack creation, navigate to the “Outputs” section of the Dash CloudFormation stack
Click on the EndpointURL to navigate to the Dash application
Complete the initial application installation
Login to Dash with your user credentials
Restore From Backup -
Navigate to Settings → Backup & Restore
Click “Restore Backup”
Click the latest backup and “Restore”
All previous application data should be restored
Routine Maintenance
Cryptographic Keys
Dash ComplyOps provides options for configuring SSL/TLS encryption for the EC2 instance and application. Users can read the following documentation for information on how to setup SSL.
SSL/TLS certificates are generated through via Let’s Encrypt.
Certificates are automatically checked daily/weekly and updated prior to expiration by the security library.
Software Patches
Dash issues periodic updates to the Dash application software and CloudFormation stack. When a new version of Dash ComplyOps is released, customers will be notified of recent changes to the application stack including system and software patches.
Users of Dash ComplyOps should update their CloudFormation stack to the latest version as soon as possible to receive the latest in order to implement changes including:
Updates to OS dependencies
Updates to application libraries
Updates to AWS resources and security configuration
AWS Service Limits
When deploying the Dash CloudFormation stack, Dash creates a VPC associated with the EC2 application instance. AWS accounts have a default limit (or quota) of 5 VPCs per Region. If your organization is at the VPC limit for the region you are installing Dash ComplyOps CloudFormation stack, you may encounter an error related to the VPC limits. To increase this limit, your team should:
Request a “Service limit increase” by navigating to Support > Your Support Cases
Select “Service limit increase”.
Select “VPC” and enter all necessary region information
Submit the support request.
After approval from AWS, your team should be able to install the Dash VPC without any errors related to limits.
Health Checks
After the Dash application stack is deployed, users can check the general health of Dash EC2 instance in AWS:
Navigate to EC2
Select Dash EC2 Instance
Click on the “Status Check” tab
Users can view the current detected status of the Dash EC2 instance
If one or more “Status Check” items is returned as failing: Navigate to the Dash endpoint/url and check that you can view the Dash application and are able to login to the platform. For further issues, consider reading the “Emergency Maintenance” section.
View instance monitoring/metrics -
Navigate to EC2
Select Dash EC2 Instance
Click on the “Monitoring” tab
Users can view graphs and metrics including Status check, CPU utilization, and Network.
For high CPU/memory usage (greater than 80%), consider changing resizing the Dash instance to a larger EC2 instance.
Emergency Maintenance
Your team can take the following steps to troubleshoot issues if your Dash ComplyOps application appears to be unavailable:
Addressing Instance/Resource Issues
If it appears that Dash is inaccessible or unavailable, your team can check the status of the Dash EC2 instance by performing the following steps:
Check instance status -
Login to AWS and navigate to CloudFormation
Select the Dash ComplyOps Stack > Navigate to the “Resources” Tab
Find and click on the EC2 instance ID
Confirm status - Confirm that both of the included EC2 status checks are positive and the EC2 instance appears to be available
Confirm size of resources -
Confirm that the Dash EC2 instance is of size t3.medium or larger.
If the instance is smaller than this size or has CPU/Memory usage higher that 80%, resize the EC2 instance to a larger size (minimum t3.medium)
Confirm that the Dash EC2 instance is attached to EBS volume with 20GB of space or larger
Resolving failed status checks -
Restart the EC2 instance - If it appears that the instance has failed status checks, you can restart the EC2 instance.
You can follow these steps for rebooting the EC2 instance.
After rebooting the instance, navigate to the Dash domain and attempt to login.
Recovery from Availability Zone (AZ) Issues -
If an availability zone (AZ) failure occurs, teams can confirm data is backed up via S3 as shown in the “Backup and Recovery” section of this doc.
Teams can relaunch the Dash service into anther availability zone by following the Restoration instructions in “Backup and Recovery” section.
Addressing application issues
If your team has followed the steps above and has confirmed that there does not appear to be a resource issue or issue with EC2, you may take the following steps to troubleshoot the status and configuration of the Dash ComplyOps application by taking the following steps:
SSH into the Dash EC2 instance
Check application services
To get the status of all application services, perform the command:
CODEpm2 statusThis command should return 3 listed services as “running”
Get Logs and information
To get logs related to application services, perform the command:
CODEpm2 show <process_name> rest rest-agendaView all log data for issues
Submit a support ticket to Dash
Submit a ticket with applicable log and application status info by following the Steps listed in “Support”
Support
Dash provides all customers with technical support. Our support team is available between 8am - 5pm EST and will respond within 24 hours of receiving a support request.
Dash users can reach out to the Dash support team in one the following ways:
Create a support ticket via the Dash Support Desk
You can visit the Dash support desk at this link
Select the appropriate issue and submit a support ticket
Please share any necessary contact information and issue details when submitting a support ticket
Send us an email at support@dashsdk.com
For application issues, please include the following information in your email:
Contact name, email address, and phone number (optional) for responding to inquiries
A description of the issue or problem
The URL where this problem has occurred
Send us a message via application chat.
Inside your Dash application, you can click on the chat icon in the bottom right-hand corner to reach our support staff.